Rebody Z3 Tribute GT project

IanA

Zorg Legend
British Zeds
Joined
Oct 4, 2014
Points
74
Location
Oxon
The arm-mounted jets I've used on my TFS spray in an X pattern and do a great job.
They are very entertaining at MOT/inspection time when the car is stationary.

On my Z300S I've used the wiper blades from an Alfa Spider. They have a perforated tube under each blade. The driver side (RHD) one needed shortening slightly.
 

t-tony

Zorg Expert (II)
Supporter
British Zeds
#ZedShed
Joined
Dec 31, 2013
Points
226
Location
Torksey Lock,Lincoln, England
Model of Z
E89 Z4 23i Auto
Some Peugeots had a clip on tube for the washers. It just clipped to the wiper arm. Very effective as you didn't get a "dry spot" when you switched the Wipers on.

Tony.
 

Foglem

Zorg Addict
American Zeds
Joined
Nov 14, 2022
Points
46
Location
Ann Arbor, Michigan
Model of Z
M Roadster
The original plan was to install the rear and then move to the front of the car. Looking at how much space the new body takes over what the OEM one will I decided to just finish stripping the car.
IMG_20230326_144327506_HDR.jpg
IMG_20230326_151750721_HDR.jpg

Front bumper and headlights removed.
IMG_20230326_152023680_HDR.jpg

I learned something really cool about this front clip. This car has brake cooling ducts on both sides. The air intake for the engine is actually split off from the ducts and directed to a space behind the front headlight. That corrugated hose at the top of the picture leads right into the air filter box. That's pretty cool! I'll address this later since I don't want to be sucking water into this. The plastic wheel well shrouds were removed after this picture. It was a bit more challenging than I expected but it's off now! I'm also not totally sure if the bumper brackets need to come off or not. I think I will leave them on for now until it's time to get the new body on the front.
IMG_20230326_161606047_HDR.jpg

Spray nozzles removed from the hood as well as the ground wire. All that's left is to pursuade some help to come lift this thing off with me. Thank you for the windshield sprayer suggestions! I ordered some wiper blade mounted ones. Cross that little guy off the list.
IMG_20230326_161558704_HDR.jpg
IMG_20230326_164026655.jpg

Side mirrors removed. Real easy. Just don't forget to unplug the connector for the power mirrors first. This was simple because I still have the inside door card removed while I wait for speakers.
IMG_20230326_141608052_HDR.jpg

Bumper has been flipped and installed back on the car. The fitment of the trunk piece is starting to make a lot more sense now.

Next thing to add to my list are:
-fuel filler extension + cap. Probably have to cut a hole into the body to recess the fuel cap. I'm going flip-top style.
-Looks like the rear trunk bit is glued on. Many people in the UK are using PU18. I don't think I have that here in the states so I'll find an equivalent. Looking up PU18 it looks like there are a few options.
-Filling the old side mirror holes. Time to read up and ask some questions. It seems pretty shallow so I'm guessing body filler would be ok here? Or maybe the proper way is to weld a piece in there.
-Light search update! Finding other aesthetics for the Lucas L692 lights is challenging. I'm finding options off of existing cars and even some motorcycles. We'll see what I land on.
 

IanA

Zorg Legend
British Zeds
Joined
Oct 4, 2014
Points
74
Location
Oxon
" ...I don't want to be sucking water into this... "
Drill a hole (diameter unspecified) as high up the hose as you can.
That way, if the lower end gets submerged, there won't be enough suction to lift water into the engine.

" Filling the old side mirror holes... "

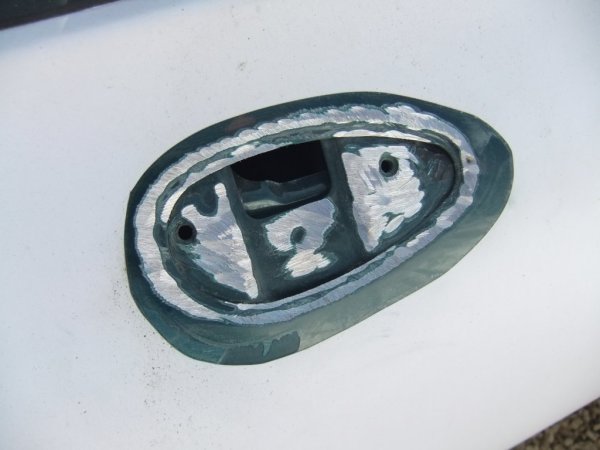
First I attacked the aperture with an angle grinder to get a good key.

DSCF2572.JPG

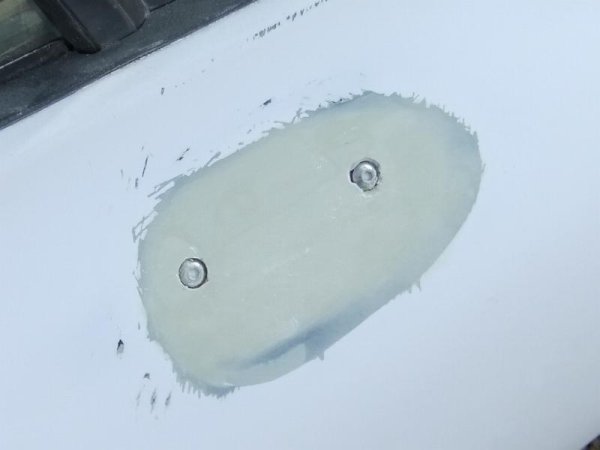
I used a product called Isopon P40 over here. Its USA equivalent is probably Bondo Glass. It's a polyester resin loaded with glass fibre. I greased two scrap M5 bolts to preserve access to the threaded inserts on the door. The car was in Boston Green. That's a white wrap on the door that I used before the respray.

DSCF2577a.JPG

Then a skim of body filler.

DSCF2578a.JPG
 
Last edited:

Foglem

Zorg Addict
American Zeds
Joined
Nov 14, 2022
Points
46
Location
Ann Arbor, Michigan
Model of Z
M Roadster
Family came and helped out! Courtesy of my brother we managed to do a test fit of everything. It's pretty exciting to see this starting to come together. The front shell had some initial clearance issues, but that was resolved by removing more of the plastic bits attached around the radiator. The horns, of all things, managed to get in the way. Rotating one of the horns around was my fix.

IMG_20230405_175813990_HDR.jpg

The far left horn shroud was just barely in the way of the fiberglass.
IMG_20230405_175220439_HDR.jpg

What is this sensor? It's a flat disk that has a two wire connection and is mounted adjacent to the radiator. I thought maybe a temperature or possibly airflow? It seems like an odd place for either of those though.
IMG_20230405_175350801_MF_PORTRAIT.jpg

IMG_20230405_182437145.jpg

How exciting is this?! I should note that I did remove one of the hood catches. There was an alignment issue when installing. I'm relatively certain it will line right up later.
IMG_20230405_183740100.jpg

The rear was easy enough to put into position. A few bolts to hold it into place and tada!
IMG_20230405_183355970.jpg

Look at those curves!
IMG_20230405_173842537_HDR.jpg

With a fun view as well!
IMG_20230405_183252608.jpg

The pursuit of light fixtures continues! After speaking with a really cool guy from a custom Harley-Davidson shop I ended up with a few lenses from some motorcycles. Yes, that's correct. Certain model years of Harely-Davidson motorcycles have 3 1/4" diameter lights. I have a few DIY plans to play around with. I'm still not opposed to the classic lucas lights. I'd really like to see some diffused LED lighting back here. I'm planning to use halo headlights so I think that would help tie it all together.

I'm spending my free time searching for:
-lights
-lucas l492(might have this wrong) boot mounted license plate light + reverse light. I've found chrome and even black options.
-Wing mirrors. I'm liking the idea of moving the wing mirrors forward of the windshield.
-fuel filler

Thank you for all the help so far!
 

IanA

Zorg Legend
British Zeds
Joined
Oct 4, 2014
Points
74
Location
Oxon
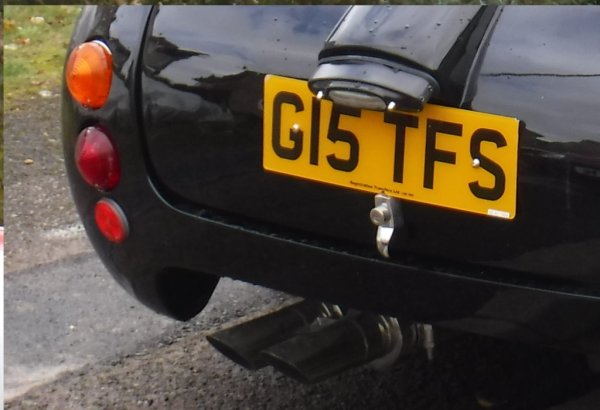
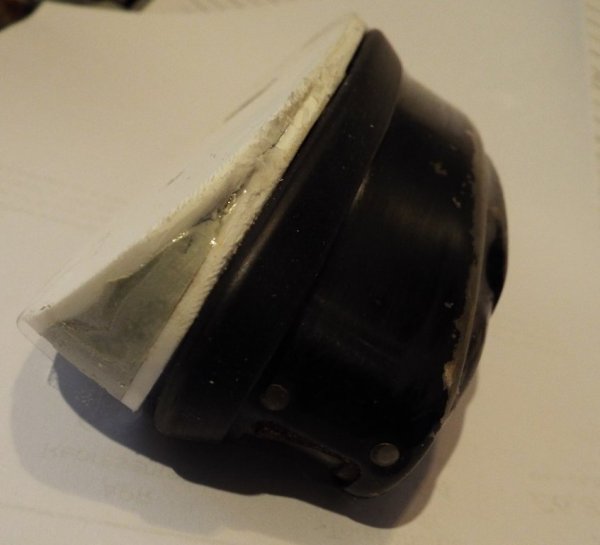
The classic Lucas 469 combined number plate/reversing light mounted on your boot (trunk) lid will be useless as a reversing light except to warn people that you have selected reverse gear- if they can be bothered to look. It will illuminate the road about 1 metre behind the car. For illumination I use my hazards.
I am working on a replacement wedged mounting plate to correct the angle of dangle. I have also made a frame to incorporate LEDs (per my original).

DSCF1991a.jpgDSCF4098a.jpgDSCF4099a.jpg
 
Last edited:

Pingu

Zorg Guru (III)
3rd Party Trader
Joined
Dec 8, 2011
Points
145
I've spent an awful lot of time doing things around the bonnet to make it more like a proper car. You've been very lucky if all you have to do is twist the horns a little :) .

Things that I've had to do...

Proper waterproof electrical connectors.
Proper washer tubing plumbing, rather than just bending a tube and putting a kink in it.
Uprated rams. They still weren't strong enough, but made lifting the bonnet easier.
Bonnet stay rod and locator.
Very heavily modified wheel arch plastics.
"Cat's whiskers" around the wheel arches to reduce road spray.
Plastic ducting at the front to reduce dirt ingress under the front of the bonnet, aid underfloor ducting into the oil cooler.

There may be some more that I can't think of :cool:

edit - there was... ...add front crash protection
 
Last edited:

Foglem

Zorg Addict
American Zeds
Joined
Nov 14, 2022
Points
46
Location
Ann Arbor, Michigan
Model of Z
M Roadster
I've been busy hunting and buying parts. Other things have happened as well.
IMG_20230422_121923713.jpg
IMG_20230422_165615790_HDR.jpg

A buddy of mine helped me out on this one. We decided to go the epoxy patch method. Using 3M 8115 panel adhesive we patched and glued the hole with a nice form fitting piece of metal. Once it's dry I'll spray it with a primer to protect it. Then later down the road I'll have to fill and smooth out. I think it will work out pretty good.
IMG_20230422_150615654_HDR.jpg
IMG_20230422_114431383_HDR.jpg

Speaking of side mirrors I got the set I ordered in and I think I'll mount them somewhere around this area. I'm doing this for legal reasons really. I don't intend for these to be very functional. This car is so small it's a lot easier to just look over my shoulder. I'm sure they will be useful once in a while I guess.
IMG_20230419_201330833_HDR.jpg

I mentioned before I don't like chrome. The mirrors I have are chrome. I decided to try an experiment and use scotchbright pads to scuff up the chrome surface. This was done on a test piece with some painters tape so the difference can be clearly seen. I like it! I'll be doing this to the mirrors shortly...
IMG_20230422_165619965_HDR.jpg

Trunk tub mounted with some Tiger Seal. The zip ties will be replaced with a nut&bolt and fender washers. I didn't have a drill at the time so this was the solution to holding things in place.

OK, now for a bit of fun. I couldn't find an off the shelf set of lights that I wanted to go with. My solution is going to be a custom setup using off the shelf parts for a motorcycle and an aftermarket halo light. Check out the test set up:
IMG_20230419_190542691_HDR.jpg
IMG_20230419_190806072_HDR.jpg

IMG_20230422_132914685_HDR.jpg

White halos up front and red in the rear to act as day time running lights. The centers in the front and the top set in the rear will turn amber for turn signals. The rears can also turn white for a really nice set of reverse lights. The bottom set in the rear will light up red for brakes. Hopefully next update I will have a base plate made up to mount the two different light fixtures to. I think it will look pretty good!
 

t-tony

Zorg Expert (II)
Supporter
British Zeds
#ZedShed
Joined
Dec 31, 2013
Points
226
Location
Torksey Lock,Lincoln, England
Model of Z
E89 Z4 23i Auto
I like the ways you can use LEDs. I found a new type that I'm bringing home to use, possibly for DRL use.

Tony.
 

Foglem

Zorg Addict
American Zeds
Joined
Nov 14, 2022
Points
46
Location
Ann Arbor, Michigan
Model of Z
M Roadster
It's been a minute but I haven't been idle. Life finds a way (to get in the way).

Alright! Lets get back to it.

I stuck with the new light design and finished them off. Basically they are an 80mm aftermarket halo (will act as day time running lights) with a center 2" aftermarket light for motorcycles. I CNC'd an acrylic ring and spray tinted them to make the lights look like one solid unit. The tolerances are nice and tight so everything fits together really well.

IMG_20230529_141443347.jpg
IMG_20230513_151953934_HDR.jpg
IMG_20230513_152003109.jpg

For the fronts the halo is white and all of the halos in the rear are red. The center lights can turn amber or white on the light shown. This is usefull for turn signals in the front and rear. The white will act as my reverse lights. The center light is red for the brake lights. (Two stages, fairly bright for running lights, then really bright for when I brake.)

Now that I don't need a reverse light on my license plate light I can spring for a MUCH cheaper version of the lucas light. Like this guy:
IMG_20230426_194412360_HDR.jpg

There were a few things to address on this. First off, in order to put mounting holes through the back of the housing I'd have to gut the inside.
IMG_20230601_184220869_HDR.jpg

The bonus of doing this is upgrading to a nice LED bulb with a fixture from a Harley Davidson. Who knew Harley's would be so beneficial to this build. I then punched out holes through the back and put in threaded couplers. The other issue is the color! I ordered some brushed metal looking vinyl wrap. Lets see how that looks...
IMG_20230602_120106426.jpg

IMG_20230602_120136090_HDR.jpg

I'm happy with this. Lets move on.

Hopping around a lot here. I got new seats in!
IMG_20230611_171344902_HDR.jpg

Woop! Very happy with these. They haven't seen sun yet so they should tighten up a bit more with time, but I think they look great.

My buddy came through with some nice speakers for me. I'm going to update the tweeters and mids in the doors which will require a bit of work to get them to mount right. I'll also need to respray the metal speaker grills. They are pretty beat up. The footwell speakers were 5 1/4", somehow I have a set of 6 1/2" that nearly drop right in. I guess the flange on the OEM speakers were pretty wide?

I also decided to dump the sub-woofer in the center. Anybody want to buy a subwoofer and enclosure? I saw in other trim models the car comes with a lockable storage bin. I'll be hunting around to swap that out. It will be much more functional that way.

More pictures Matt!! OK ok.

Next on the list was a fuel filler. I found this...from a motorcycle. I really like it because it's small, clean and simple. I do like the classic flip top fuel fillers, but in my opinion it's just a required functional component of the car and I don't want to draw attention, so this is what I found:
IMG_20230501_191822235_HDR.jpg
IMG_20230501_191827644_HDR.jpg

I'm not 100% sure this will work yet, but we'll get there.

Time for wiring! I got a set of waterproof connectors and picked up a pack of soldersticks (these things are cool and make a nice solid connection requiring a heat gun.)
IMG_20230622_214423313_HDR.jpg

In the above picture, the license plate is held on with painters tape. I just needed a visual. I'm really happy with the lights. I'm thinking of trying to recess the license plate light more. It sticks out pretty far. Maybe another 3/4" in? Debating on this..
IMG_20230622_214439907_HDR.jpg


Now it's time to start aligning these headlight buckets. I wish they came with a flange so it would have more of a connection point when it comes time to glue it to the body. I'm going to use a polyester resin, and with the suggestion from a friend, a strip of fiberglass around the edge to give it a bit more structure.

IMG_20230611_190210890_HDR.jpg

You can also see the front halo/turn signals are mounted here as well. Oh, I also got my grill in...
IMG_20230428_135553650_HDR.jpg

You can see this painted and in place in the above picture. I think I'll fill the outside so it merges with the rest of the body for a nice smooth look. Here's a before and after look.
IMG_20230618_163319378_HDR.jpg

IMG_20230622_214946693_HDR.jpg


The headlights will be projectors. Also with a white halo that will turn amber with the turn signals.
1687712265590.png

I cannot wait to see these in the car.

Decided to play around and pretend it was done. Check out this view! I was most definitely not making engine noises here. Also bonus of the side view mirros actually being effective..
IMG_20230611_171404733_HDR.jpg


IMG_20230622_214449660_HDR.jpg

IMG_20230622_213052281_HDR.jpg


Thank you! Also I'd welcome any suggestions on the build if you are watching and shaking your head.
 

Foglem

Zorg Addict
American Zeds
Joined
Nov 14, 2022
Points
46
Location
Ann Arbor, Michigan
Model of Z
M Roadster
I've spent an awful lot of time doing things around the bonnet to make it more like a proper car. You've been very lucky if all you have to do is twist the horns a little :) .

Things that I've had to do...

Proper waterproof electrical connectors.
Proper washer tubing plumbing, rather than just bending a tube and putting a kink in it.
Uprated rams. They still weren't strong enough, but made lifting the bonnet easier.
Bonnet stay rod and locator.
Very heavily modified wheel arch plastics.
"Cat's whiskers" around the wheel arches to reduce road spray.
Plastic ducting at the front to reduce dirt ingress under the front of the bonnet, aid underfloor ducting into the oil cooler.

There may be some more that I can't think of :cool:

edit - there was... ...add front crash protection
Thank you for your comments!

Where did you find upgraded rams for the hood? At some point I'm implementing a hood stay but I'm getting tired of lifting this thing all the time. Thanks!
 

Foglem

Zorg Addict
American Zeds
Joined
Nov 14, 2022
Points
46
Location
Ann Arbor, Michigan
Model of Z
M Roadster
Well some good news and some bad news!

Bad news first. I have to rebuild my custom lights. I potted the LED's with the wrong kind of glue and it destroyed them. Electronics grade silicone on the way so I'll start over.

Good news time! I've got the front end mostly wired up! I can't wait to see it with all the lights.
IMG_20230712_210639636_HDR.jpg

Screenshot_20230712-210452~2.png

I'm pretty excited for these halos. I'm antsy to see them with the rest of the lighting. More to come soon!
 

Foglem

Zorg Addict
American Zeds
Joined
Nov 14, 2022
Points
46
Location
Ann Arbor, Michigan
Model of Z
M Roadster
Made a bit more progress! I had to take it outside for a bit of motivation. The lights are in though!
IMG_20230809_201910278_HDR.jpg

The headlights look a bit funky beacause they still have a protective plastic covering on them. The grill is just resting in there. The plan is to merge that with the body so you won't see the outside lip anymore.
IMG_20230809_201729258_HDR.jpg

The license plate light IS working but it's inside the trunk. I'm still figuring out a new mount for it. I cut a hole in the original mounting location so I could recess the light a bit more. It looked a bit weird sticking out as far as it did.
IMG_20230812_185937174_HDR.jpg

The only remaining issues I have with the lights are:
1. 'hyperflashing'...because I installed LED lights the car thinks a light is out and so the turn signals blink extra fast. I could either install resistors in light with all the light bulbs or modify the turn signal relay. I think I will take a look at the relay and see how viable that option is.
2. The reverse lights are not coming on. Hopefully something silly.
3. I installed a switch into the trunk to activate/deactivate the 'real' rear lights. The halos look cool in the rear as they are in the pictures, but I do not trust them on the road. The switch is there so I can take cool photographs, then I can flip the switch and drive home with the safety of actual legal lights. That's the idea anyway...
IMG_20230812_190003762_HDR.jpg

*halos only. If I'm on the road, the bottom two lights should have their centers lit too. I will look into this.
IMG_20230812_185642904.jpg

Can you tell it has been sitting for a while? It was good to drive it around and clean off those brake rotors.

Next on my task list are:
1. Hood struts! I need to reinstall them. Lifting that huge hood up over and over is getting old. Does anybody have some advice? The struts are about 1/4" too long so I need to compress them to fit them to the car. I'm not exactly sure how to do that. I can't do it by hand.
2. Add license plate mount.
3. Create the license plate light bracket.
4. A bit more cable management.
5. Add/modify the under tray of the car.

It felt so good to drive it!
 

Pingu

Zorg Guru (III)
3rd Party Trader
Joined
Dec 8, 2011
Points
145
You can't compress the struts, you will need to cut the rams. I've been down this journey, and it took me about six months to solve the problem.

You need to calculate the force required to open the bonnet (measured along the current plane of the strut). Z3 struts are 770N each, so you can assume the pins are good for 1500N each, but if one fails, it may get expensive!

Use a Sharpie to mark the current pin positions on the bonnet. Close the bonnet, and measure the distance between the pins. Open the bonnet to the desired opening position, and measure the distance between the pins.

Source a pair of struts (preferably adjustable) powerful enough to do the job, and get their dimensions. Don't buy them yet. The fully closed length is the important dimension. The fully open dimension also needs to be known.

If the closed length of the strut is longer than the closed pin-to-pin dimension, you will need to find a way to relocate the body pin. It will need to be along the same pin-to-pin line, or higher. If the new pin location is below the existing pin-to-pin line, the rear of the bonnet will be forced up when the bonnet is closed - I know this from experience.

Assuming all is good so far, you will need to ensure the open length of the strut is long enough to open the bonnet to the desired position. Hopefully it is, or you will need to try to extend the ram. Ideally, it will be too long.

At this point, it's time to bite the bullet and purchase the struts.

Make a fitting that allows full clearance around the bonnet pin, and attach this fitting to the end of the ram.

Measure the pin-to-pin distance of the open strut, and compare it to the pin-to-pin distance of the open bonnet.

Prepare to cut and rethread the rams.

If the open position of the bonnet is fully open, you will need to cut the rams about 5mm shorter than the measurement. If you can open the bonnet a bit further, then cut the rams and rethread them to accept the fitting that you made.

The open bonnet pin-to-pin distance and the open strut pin-to-pin distace should be the same.

The struts can now be fitted.

Adjust the strut pressure as required.

If the struts are not strong enough, either get stronger struts or make a stay bar. I wouldn't advise going for struts that are more than 1500N each.


I can feel another video coming on :)
 

jaguartvr

Zorg Guru (I)
Joined
Jan 9, 2017
Points
95
Z3 LED flasher mod thread

 
Top