You are using an out of date browser. It may not display this or other websites correctly.
You should upgrade or use an alternative browser.
You should upgrade or use an alternative browser.
Rebody Z3 Tribute GT project
- Thread starter Foglem
- Start date

I've been taking it out to shows and enjoying it a bit. Then finally got around to some much needed TLC.
This engine is known for having cooling problems. In that the clutch fan will shatter and take things with it. The solution was to remove the fan and put in a lower threshold switch so the front fan will turn on earlier. While I was in there a metal impellar water pump, new thermostat, metal thermostat housing and an aluminum radiator were added. The plastic side tanks on the existing radiator were starting to concern me because I knew they would separate at some point. Might as well do it all.
I was definitely glad about my decision! The coolant was so thick a screwdriver had to be used to get it to start flowing!

That's coolant?! Yeesh.

A good third of this radiator was completely clogged up! It's amazing I never had temperature issues.

A nice bonus is I have room to work now.
Replaced both belts and new fluids for the transmission and rear differential!
Enjoyed a few shows and making a list of things to work on.


More to come!
This engine is known for having cooling problems. In that the clutch fan will shatter and take things with it. The solution was to remove the fan and put in a lower threshold switch so the front fan will turn on earlier. While I was in there a metal impellar water pump, new thermostat, metal thermostat housing and an aluminum radiator were added. The plastic side tanks on the existing radiator were starting to concern me because I knew they would separate at some point. Might as well do it all.
I was definitely glad about my decision! The coolant was so thick a screwdriver had to be used to get it to start flowing!
That's coolant?! Yeesh.
A good third of this radiator was completely clogged up! It's amazing I never had temperature issues.
A nice bonus is I have room to work now.
Replaced both belts and new fluids for the transmission and rear differential!
Enjoyed a few shows and making a list of things to work on.
More to come!
Last edited:
- Joined
- Dec 26, 2016
- Points
- 144
- Location
- Spaldingski, Lincs
- Model of Z
- 3 litre Z3 pretending to be Italian exotica. Two previous E89 Z4s.
I agree. When I first saw this was going to have a modern twist, I wasn't sure; but it looks very good and individual. Sort of 'restomod' feel about it.That is a great looking motor. It looks like it is not out of place with the 'classics' surrounding it. Stands on its own")
Put the updated cooling system through it's paces! I took the car to an autocross and managed to place 26/163 in raw time. I'm pretty happy with that considering there are a LOT of very fast drivers and cars out there.
The car held up great with no issues other than the shifter knob popped off and we had to shift using just the rod. I'm rebuilding the shifter linkage soon so I'm hoping the new rod will have a bit more bite to hold the knob on. If not I'll have to use a set screw or something.
Anyway, enjoy a run!
Autocross at Michigan International Speedway (YouTube)
More updates coming!

Latest updates on some things. First off, I hit a small deer. In the end I came out lucky but not without some damage.

It looks like the body flexed quite a bit. The headlight lens is shattered as well as damage to the headlight bracket itself. My hood release was broken off, which may have actually helped prevent the fiberglass from shattering. I can't see any other obvious cracks so I think it's just the paint cracking during the flex. I have some paint work to do under here anyway, but...bummer.

I have no idea why this picture is so yellow, but you can see how much the body flexed. This was my hood release bracket that got bent.

My brand new aluminum radiator was pushed into the front crossmember. No leaks but there are sections where the fins got crushed. Woof.
Alright...while I repair and work on that stuff lets get back to some other fixes.

Ignoring how dirty the car is right now. I added a bracket forward of the rear tire to pull the rear panel in. It was sticking out over the bottom sill quite a bit. It's nice and flush now!

This is a picture of the trunk (boot) lid. It wasn't sitting quite right so I added these adjustable rubber stops to level the gaps out. This will fix and prevent some rubbing that was happening. Still need to finish the inside..

Since I was bonding things together I decided to start working on the wheel well liners again. I am using the cardboard as a 'jig' to support the rubber strips as the glue sets. When the hood (bonnet) closes, this rubber strip will close the gap between the existing wheel well liner and body. This should help prevent rocks being shot into the headlight buckets from behind.
I'll leave you with some recent car show pictures!


For the first time ever...my car looks HUGE next to an MG.

It looks like the body flexed quite a bit. The headlight lens is shattered as well as damage to the headlight bracket itself. My hood release was broken off, which may have actually helped prevent the fiberglass from shattering. I can't see any other obvious cracks so I think it's just the paint cracking during the flex. I have some paint work to do under here anyway, but...bummer.
I have no idea why this picture is so yellow, but you can see how much the body flexed. This was my hood release bracket that got bent.
My brand new aluminum radiator was pushed into the front crossmember. No leaks but there are sections where the fins got crushed. Woof.
Alright...while I repair and work on that stuff lets get back to some other fixes.
Ignoring how dirty the car is right now. I added a bracket forward of the rear tire to pull the rear panel in. It was sticking out over the bottom sill quite a bit. It's nice and flush now!
This is a picture of the trunk (boot) lid. It wasn't sitting quite right so I added these adjustable rubber stops to level the gaps out. This will fix and prevent some rubbing that was happening. Still need to finish the inside..
Since I was bonding things together I decided to start working on the wheel well liners again. I am using the cardboard as a 'jig' to support the rubber strips as the glue sets. When the hood (bonnet) closes, this rubber strip will close the gap between the existing wheel well liner and body. This should help prevent rocks being shot into the headlight buckets from behind.
I'll leave you with some recent car show pictures!
For the first time ever...my car looks HUGE next to an MG.
Minor update here.
With some advice from some kind people on here I've decided to seal the underside of the hood (bonnet). This was a lot like painting oatmeal. Id prefer to never do that again. If I do..I'll take further advice and do it with the front off of the car and upside down. What a mess.


I have the headlight lenses off for now... mostly because they shattered when I hit a deer. I'm hoping Chris from tribute gets some new lenses in so I can order more. Id rather not make them.
While I was fiddling around I realized my front tires were shot!

So I got some new RT660's for the front. Once the rears wear down I'll replace all four with a new tires. These tires are great but they need a lot of heat to be real sticky and are downright scary in the rain. Perhaps some re71rs next.
Anyway, after new tires I thought I'd better get an alignment. It turns out I eyeballed it pretty good! 3.5deg negative camber on each front wheel. I had that backed off to -3deg but the wheels were toe in pretty good so I had them set to toe out just a tad for better turn in.
I'll have more pictures next time!

With some advice from some kind people on here I've decided to seal the underside of the hood (bonnet). This was a lot like painting oatmeal. Id prefer to never do that again. If I do..I'll take further advice and do it with the front off of the car and upside down. What a mess.
I have the headlight lenses off for now... mostly because they shattered when I hit a deer. I'm hoping Chris from tribute gets some new lenses in so I can order more. Id rather not make them.
While I was fiddling around I realized my front tires were shot!
So I got some new RT660's for the front. Once the rears wear down I'll replace all four with a new tires. These tires are great but they need a lot of heat to be real sticky and are downright scary in the rain. Perhaps some re71rs next.
Anyway, after new tires I thought I'd better get an alignment. It turns out I eyeballed it pretty good! 3.5deg negative camber on each front wheel. I had that backed off to -3deg but the wheels were toe in pretty good so I had them set to toe out just a tad for better turn in.
I'll have more pictures next time!
I was able to take it to another autocross and had a blast!
Youtube Tire Rack Autocross


I also had a chance to have a professional photographer take some shots for me. I figured I'd better get some pictures done before any other damage happens. New headlight lenses are ordered!

.webp")
.webp")
.webp")
.webp")
.webp")
.webp")
.webp")
.webp")
.webp")
.webp")
.webp")
.webp")
.webp")
.webp")
.webp")
Thanks! More stuff to come!
Youtube Tire Rack Autocross
I also had a chance to have a professional photographer take some shots for me. I figured I'd better get some pictures done before any other damage happens. New headlight lenses are ordered!
Thanks! More stuff to come!
Everything about this thread it’s just so awesome, topped off by that fantastic photo- shoot!!!
Thanks for sharing with us
Thanks for sharing with us
Thanks that's super nice!Everything about this thread it’s just so awesome, topped off by that fantastic photo- shoot!!!
Thanks for sharing with us
Winter is coming so I'm focusing on interior again. I also some really fun new toys/projects to take on that I'll share soon.
For now I decided to trim out the trunk(boot).


As it turns out it's fairly tricky to do! So here's my take on it..

I still have a bit of clean up to do. I think for the outside of the trunk I'll add some body filler to smooth it out and just paint it black.
The weather stripping appears to be working because I've been caught in the rain a bunch and no water intrusion!
Alright, more coming soon!
For now I decided to trim out the trunk(boot).
As it turns out it's fairly tricky to do! So here's my take on it..
I still have a bit of clean up to do. I think for the outside of the trunk I'll add some body filler to smooth it out and just paint it black.
The weather stripping appears to be working because I've been caught in the rain a bunch and no water intrusion!
Alright, more coming soon!
- Joined
- Dec 8, 2011
- Points
- 165
Those carpets look like they are moulded. If so, where did you get them, or how did you make them?
I got them from OnlineFabricStore. They are not molded. I ordered 2 yards and spent some time figuring out the best way to cut the carpet. Then I used an adhesive (5200 Marine Sealant) to hold them in place. There was an order of operations to get the cut outs to sit how I wanted them. Just took a bit of time and patience.Those carpets look like they are moulded. If so, where did you get them, or how did you make them?
It is extremely cold here now, so I can only work on so much before freezing in place. Fun things are in the works though!
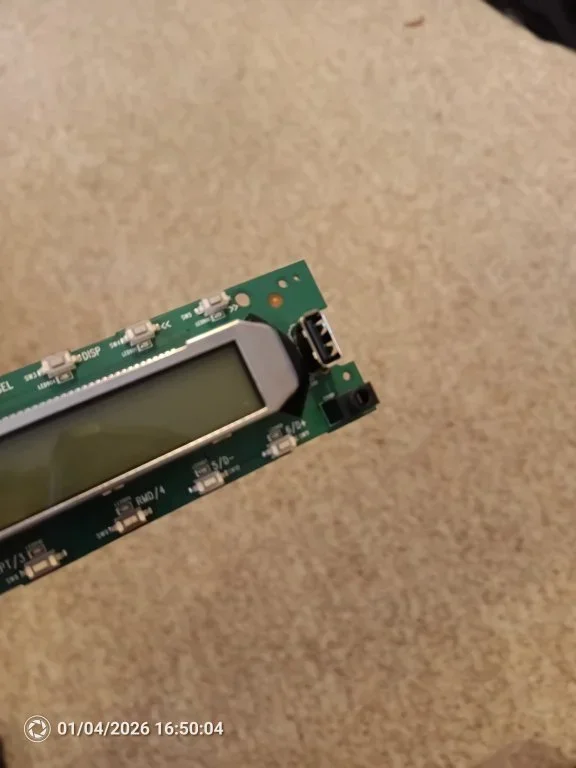
I'm keeping myself busy with quality of life improvements for the time being. The first being a phone mount. I should mention I don't like the way phone mounts look, so I want to make it as covert as I can. That's when I noticed I have a clock that is really bad at keeping time, and I never look at it anyway.

We can also see the trim is in very poor shape. I'll have to see if I can 3d print replacements. The original glue residue still shows...but lets not fixate on that. Look at this clock. The vinyl wrap is not great either. Which makes sense. This is the first one I ever did, so lets take it out.

I picked up a phone mount with a threaded insert....which you can't see because I didn't take a picture of it.

At this point I completely gutted the clock and added some new hardware. I then cut the clock hands off and glued them to the clock face.


What I have left is this...

Also a nice new vinyl wrap was applied. The idea here is that when I want I can hook up the phone mount to it or completely remove it and we'll only see the threaded hole. Which I'm hoping won't be too obvious.

Hhere is the phone mount now mounted to the modified clock. It has an adjustable arm for easy positioning.

Ignoring the missing stereo (I'll address this next post.)...and how damaged the trim is...tbd...we can see the gauge mounted back in and I'm pleased with the look. Also notice the time is 3:20 (3.2L get it?!). It still lights up like a normal guage as well

Note that I updated the mount with the Loki symbol, can't have name brands floating around here. It's all in the details. No more looking down into the center console for navigation when I need it.
Thanks!
I'm keeping myself busy with quality of life improvements for the time being. The first being a phone mount. I should mention I don't like the way phone mounts look, so I want to make it as covert as I can. That's when I noticed I have a clock that is really bad at keeping time, and I never look at it anyway.
We can also see the trim is in very poor shape. I'll have to see if I can 3d print replacements. The original glue residue still shows...but lets not fixate on that. Look at this clock. The vinyl wrap is not great either. Which makes sense. This is the first one I ever did, so lets take it out.
I picked up a phone mount with a threaded insert....which you can't see because I didn't take a picture of it.
At this point I completely gutted the clock and added some new hardware. I then cut the clock hands off and glued them to the clock face.
What I have left is this...
Also a nice new vinyl wrap was applied. The idea here is that when I want I can hook up the phone mount to it or completely remove it and we'll only see the threaded hole. Which I'm hoping won't be too obvious.
Hhere is the phone mount now mounted to the modified clock. It has an adjustable arm for easy positioning.
Ignoring the missing stereo (I'll address this next post.)...and how damaged the trim is...tbd...we can see the gauge mounted back in and I'm pleased with the look. Also notice the time is 3:20 (3.2L get it?!). It still lights up like a normal guage as well
Note that I updated the mount with the Loki symbol, can't have name brands floating around here. It's all in the details. No more looking down into the center console for navigation when I need it.
Thanks!
Attachments

I like that. And your clock will be absolutely accurate twice a day which is better than it was. 
The weather is getting nicer so I can start playing again!
More progress was made on the trunk upholster:

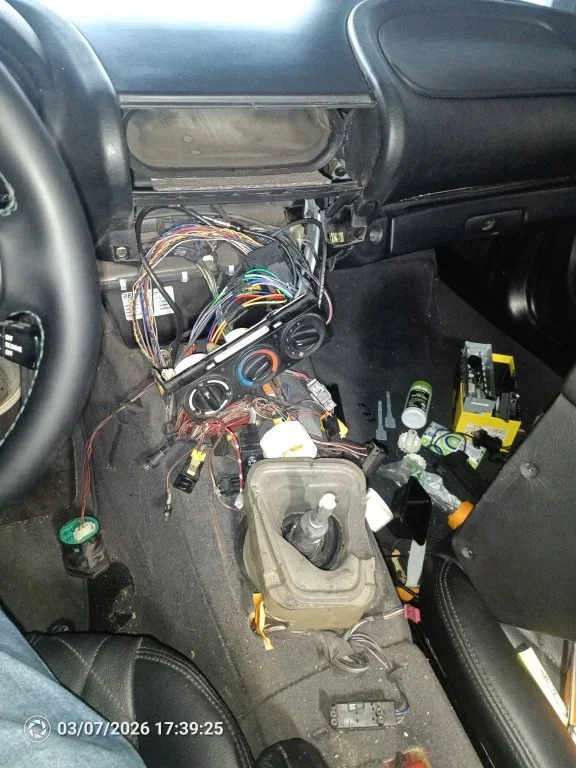
I then decided to completely remove the center console and address the cracked plastic shifter surround.

The plastic trim around the shifter is known to be a weak spot. It is extremely common to see the plastic around the AC buttons to be cracked or missing. Here is what mine looked like.

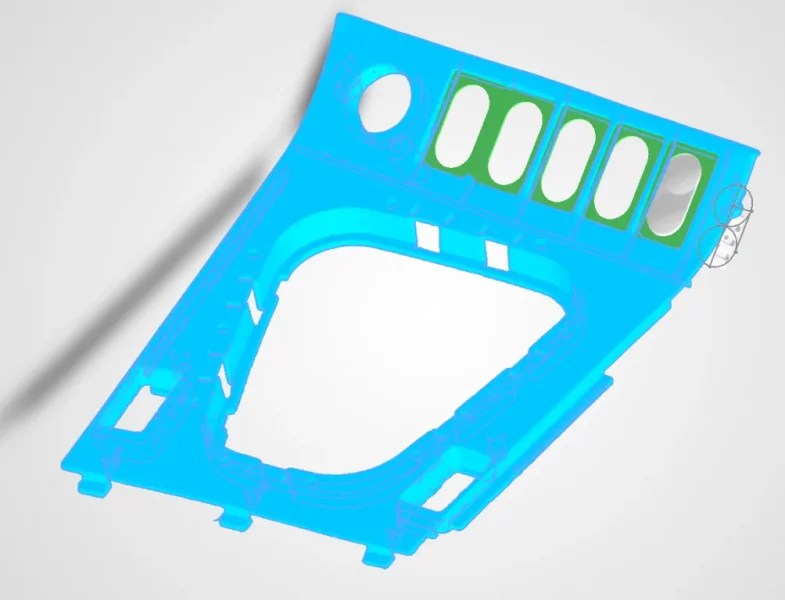
They are also crazy expensive to replace! Even 3d printed ones. I decided to try and salvage what I have and see how that turns out. So I scanned the trim and buttons in with the idea to replace them with an aluminum surround. This was a great learning process for the scanner and getting familiar with SolidWorks.
The initial scan of the trim.

Then created a something that I thought would work.
 ->
->

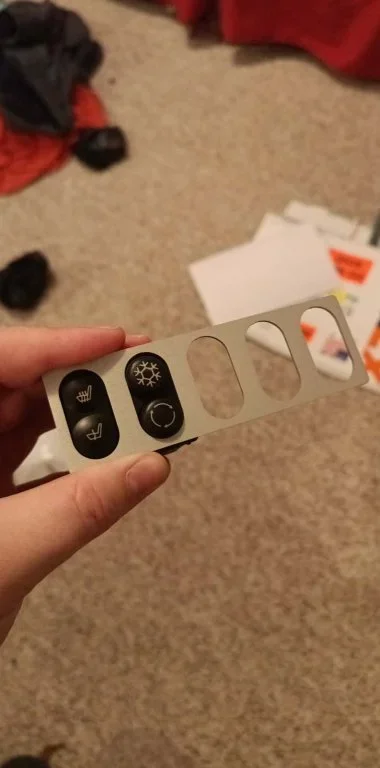
Next step was to send the design off to SendCutSend and got some nice clear anodized aluminum pieces!

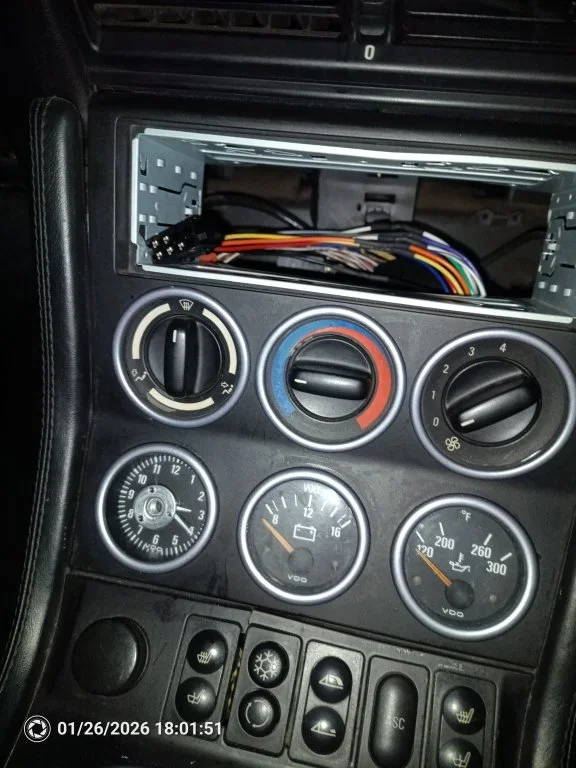
They fit great! This might actually work. I then assembled everything, but not before vinyl wrapping the stained & scratched plastic. I did this to both the shifter surround and the stereo & gage pod trim.

Then tossed it all back into the car!.....Right after I finished modifiying the stereo..
As I mentioned in earlier posts, I turned my clock into a phone mount. I also replaced the cigarette lighter with a USB charger. Since my stereo has a front facing USB port I decided to take apart the stereo and solder a USB cable to it and extend it out the back. Why do this? Cables are ugly. This reduces cables in the cabin by connecting the phone to the stereo through the charger in the cigarette lighter position.
This is the stereo face and USB cable. The next step was just to add a USB connector to the other side.


Then I punched a hole, added a nice grommet and ran a cable out of the back. I should mention I also hot-glued the cable to the connector inside the head unit.

What we have left is a pretty clean setup. I have a dedicated 4 inch (~10cm) USB cable to jump from the cigarette lighter position to the phone mount just above it. Nice and clean. You can see here that the aluminum looks pretty good. Ignore the missing volume knob and vent....I got ahead of myself and took a picture before I was finished assembling.

I took care of the basics and did an oil change and sent off an oil sample to Blackstone lab to try and get a read on the health of the engine internals.
Now is as good a time as ever to start scanning large parts of the car in. I started with the front of the engine bay. I have some plans for some supports, bumper bar and mounting positions for various projects.
Lets start with the scanner...when you don't want to spend big money on a laptop and have a perfectly good desktop computer...make it portable by shoving it in a box and adding a huge battery. Meet "Scanamatronio". The portable-ish scanning unit compplete with monitor, cushions and of course good airflow.

I wanted a nicer accurate scan so I used reference dots. These help the scanner out tremendously. Yes, it took a while.

Which turned out pretty good.

After some post-processing I managed to clean it up quite a bit. This will be really helpful for taking measurements and creating pieces in CAD. It will allow me to check fitment before I even fabricate a part.

I may have to come back and redo some scans, but this is very promising.
I decided to do the front fascia as well. I plan on doing the entire car in the near future. Notice the headlight lenses are back, but I need to trim them a bit for better fitment.


Lots more updates coming! Thanks again for following along!
More progress was made on the trunk upholster:
I then decided to completely remove the center console and address the cracked plastic shifter surround.
The plastic trim around the shifter is known to be a weak spot. It is extremely common to see the plastic around the AC buttons to be cracked or missing. Here is what mine looked like.
They are also crazy expensive to replace! Even 3d printed ones. I decided to try and salvage what I have and see how that turns out. So I scanned the trim and buttons in with the idea to replace them with an aluminum surround. This was a great learning process for the scanner and getting familiar with SolidWorks.
The initial scan of the trim.
Then created a something that I thought would work.
Next step was to send the design off to SendCutSend and got some nice clear anodized aluminum pieces!
They fit great! This might actually work. I then assembled everything, but not before vinyl wrapping the stained & scratched plastic. I did this to both the shifter surround and the stereo & gage pod trim.
Then tossed it all back into the car!.....Right after I finished modifiying the stereo..
As I mentioned in earlier posts, I turned my clock into a phone mount. I also replaced the cigarette lighter with a USB charger. Since my stereo has a front facing USB port I decided to take apart the stereo and solder a USB cable to it and extend it out the back. Why do this? Cables are ugly. This reduces cables in the cabin by connecting the phone to the stereo through the charger in the cigarette lighter position.
This is the stereo face and USB cable. The next step was just to add a USB connector to the other side.
Then I punched a hole, added a nice grommet and ran a cable out of the back. I should mention I also hot-glued the cable to the connector inside the head unit.
What we have left is a pretty clean setup. I have a dedicated 4 inch (~10cm) USB cable to jump from the cigarette lighter position to the phone mount just above it. Nice and clean. You can see here that the aluminum looks pretty good. Ignore the missing volume knob and vent....I got ahead of myself and took a picture before I was finished assembling.
I took care of the basics and did an oil change and sent off an oil sample to Blackstone lab to try and get a read on the health of the engine internals.
Now is as good a time as ever to start scanning large parts of the car in. I started with the front of the engine bay. I have some plans for some supports, bumper bar and mounting positions for various projects.
Lets start with the scanner...when you don't want to spend big money on a laptop and have a perfectly good desktop computer...make it portable by shoving it in a box and adding a huge battery. Meet "Scanamatronio". The portable-ish scanning unit compplete with monitor, cushions and of course good airflow.
I wanted a nicer accurate scan so I used reference dots. These help the scanner out tremendously. Yes, it took a while.
Which turned out pretty good.
After some post-processing I managed to clean it up quite a bit. This will be really helpful for taking measurements and creating pieces in CAD. It will allow me to check fitment before I even fabricate a part.
I may have to come back and redo some scans, but this is very promising.
I decided to do the front fascia as well. I plan on doing the entire car in the near future. Notice the headlight lenses are back, but I need to trim them a bit for better fitment.
Lots more updates coming! Thanks again for following along!
Attachments
The last post was kind of all over the place. Lets slow it down and finish some things off.
One of the long term items I've been needing to address is the broken trim that sat above the OEM subwoofer. It has been zip-tied in place for a while now. This somehow convinced me to do the rest of the audio system. I've replaced the door mids and tweeters. I changed the footwell 5.25" speakers with 6.5". I am disconnecting the rest and adding a subwoofer between the seats.
Lets start with the goods. A nice low -profile Pioneer TS-A2000LD2 8" subwoofer and let's replace the amplifier with something better qualified for the position. A Kicker CXA660.5 5 channel amp.


I found both of these on Ebay!
I mounted the amplifier in the OEM position. This was a matter of punching holes on the bottom side of the new amp. Worked perfectly.


OK, I'll likely have to play with the trim to make it look nice covered up. We'll get there.
I forgot to add pictures of the fuse and wiring. It was pretty straight forward. I will add an enclosure for the fuse just to make things look nice.
The subwoofer location is a very odd shape. I did some measurements and found that I could fit an enclosure that met the volume specifications for the speaker.
.webp")
I have this masked off because I needed to remove some of the plastic mounting bits and trim in order to fit the box.
Here's the initial box in bare form. It was then painted and sealed. I was not concerned with looks since this will all be hidden.
.webp")

The tricky part was the lid. I wanted something smooth and as OEM looking as possible. I do not want this to draw attention to itself but rather compliment the existing interior. I then cut it out to meet the shape. I also had to extend the rear of the lid as well. This helps hide some of the trim gaps.

Next was mounting the speaker. I had to ditch the bezel that it came with because I didn't have much space to work with. I also had to trim part of the mounting bracket.

If it isn't obvious in the above picture. I cut out a step to recess the bracket. I didn't want any of the bracketry to be visible. Next step was to add a top...to the top...this adds more material to help meet the height of the existing trim. It also hides the brackets. Everything was then sanded down to match the curves. I then used clay to smooth over the hardware.


I then painted it and mounted it up! Voila!
.webp")

More stuff coming! Thanks!
One of the long term items I've been needing to address is the broken trim that sat above the OEM subwoofer. It has been zip-tied in place for a while now. This somehow convinced me to do the rest of the audio system. I've replaced the door mids and tweeters. I changed the footwell 5.25" speakers with 6.5". I am disconnecting the rest and adding a subwoofer between the seats.
Lets start with the goods. A nice low -profile Pioneer TS-A2000LD2 8" subwoofer and let's replace the amplifier with something better qualified for the position. A Kicker CXA660.5 5 channel amp.
I found both of these on Ebay!
I mounted the amplifier in the OEM position. This was a matter of punching holes on the bottom side of the new amp. Worked perfectly.
OK, I'll likely have to play with the trim to make it look nice covered up. We'll get there.
I forgot to add pictures of the fuse and wiring. It was pretty straight forward. I will add an enclosure for the fuse just to make things look nice.
The subwoofer location is a very odd shape. I did some measurements and found that I could fit an enclosure that met the volume specifications for the speaker.
I have this masked off because I needed to remove some of the plastic mounting bits and trim in order to fit the box.
Here's the initial box in bare form. It was then painted and sealed. I was not concerned with looks since this will all be hidden.
The tricky part was the lid. I wanted something smooth and as OEM looking as possible. I do not want this to draw attention to itself but rather compliment the existing interior. I then cut it out to meet the shape. I also had to extend the rear of the lid as well. This helps hide some of the trim gaps.
Next was mounting the speaker. I had to ditch the bezel that it came with because I didn't have much space to work with. I also had to trim part of the mounting bracket.
If it isn't obvious in the above picture. I cut out a step to recess the bracket. I didn't want any of the bracketry to be visible. Next step was to add a top...to the top...this adds more material to help meet the height of the existing trim. It also hides the brackets. Everything was then sanded down to match the curves. I then used clay to smooth over the hardware.
I then painted it and mounted it up! Voila!
More stuff coming! Thanks!
I've been planning to do this service for a while. Ever since the clutch slave cylinder exploded I knew I'd have to do the clutch...which follows with a whole lot of "while your in there" type of things.
1. Clutch
2. Rear-main seal
3. Pilot bearing
4. Oil pan gasket
5. Oil pump nut modificatino
6. Transmission input shaft seal
7. New fork, throw-out bearing.
8. Shifter detent service
9. Shifter bushings plus a duel sheer selector rod upgrade.
10. Drive shaft flex disc
Lets get to it. A buddy let me put the car up in his barn. He also has an S52 car. It needs a bit of love.

The first thing to do was remove the entire exhaust, heat shield and the X brace under the engine. Then I disconnected the drive-shaft.
.webp")
The next step was to completely forget about taking pictures and focus on remvoing the transmission. It took some time to figure out but the key is pitching the engine&transmission backwards and using really long extensions. This seems to be the best way to disconnect the bell housing from the engine.
First off, the rattling noise inside the transmission was the piston from the exploded slave cylinder. It was way bigger than I thought it was. There were many metal bits to clean out. I put it next to a 10mm socket for context.

As for the damage it caused...some yes. Look how beat up the back of the pressure plate was.

The other victim here were some of the support fins. Two of them got pretty chewed up. Look past the spline shaft.
.webp")
From here I decided to pretend that everything would be fine and continued. First things first. Shifter detents. This service, while a bit intimidating at first, was really not that bad at all.
.webp")
I forgot to take pictures, but after this I put a new fork, pivot pin, throw-out bearing, input seal and cover to the inside of the bell housing.
Then I removed the clutch assembly. It was here that I decided to order a new flywheel.
.webp")
Definitely some interesting wear happening here. The clutch itself was toast as well.
.webp")
.webp")
Still more dissassebly to go. I should mention just how slimy and grimy the oil pan and transmission were. The oil pan gasket had failed some time ago and the under side of the car was absolutely filthy. I spent quite a bit of time cleaning. Anyway, I had to brace the engine so it wouldn't fall on me while I removed the front subframe crossmember in order to gain enough clearance to pull the oil pan.

A bunch of bolts later and it's off! This is after I cleaned it up, but overall not too bad! No scary sparkles or anything too concerning.
.webp")
I bought a wire nut to replace the existing oil nut sprocket. Apparently they can walk off randomly. Seemed like good insurance so I replaced the nut and tied it to one of the arms of the sprocket. All of this is off picture because I'm a terrible photographer.
.webp")
Yep...25cm to the right and you would see it. Oh well. You can see how bad the original gasket was. Most of it is still sticking to the engine in this picture. I had to spend a good amount of time cleaning this up being careful not to gauge the aluminium.
I started working my way backwards from here. I put the new pan back in, along with a new seal for the oil dipstick. That's an important bit. Then I went to the rear of the engine. This part was awesome. I used a few slices of bread to push out the pilot bearing. Cleaned up as it went! I can't believe how well this worked. Push bread into the center and keep hammering it in with a socket extension. Keep adding bread until it begins to push the bearing out. Worked so well. So, new bearing, rear main seal and gasket. Done.
.webp")
After that I added the new clutch assembly and flywheel. All new hardware used.

Moving back to the transmission itself. I decided I would do as much of the shifter linkage outsdie the car as I could to make life easier for me. Look at the difference before and after the new shifter rod coupler is. I don't remember what it's called. The bushing inside it was completely gone.

.webp")
Do you have a vibration when you accelerate? Check out your drive shaft flex disc/guibo. Cracks are bad. Here's the one I replaced.
.webp")
I guess this is where I apologize and got so excited I stopped taking pictures. Everything went back together fairly smoothly. I installed the DSSR as the only real upgrade to the shifter pushings other than a poly pivot (point? bushing? whatever.)

Let me tell you the combination of the new detents, bushings and the dssr have made a WORLD of difference. I have to learn how to drive the car again. The clutch engagement feels about the same, but I should probably adjust it a bit since it catches near the end of the clutch pedal travel.
Everything feels tightened up. Very happy with this and glad I have it out of the way. Also happy to report no fluids have escaped the new gaskets as far as I can tell.
1. Clutch
2. Rear-main seal
3. Pilot bearing
4. Oil pan gasket
5. Oil pump nut modificatino
6. Transmission input shaft seal
7. New fork, throw-out bearing.
8. Shifter detent service
9. Shifter bushings plus a duel sheer selector rod upgrade.
10. Drive shaft flex disc
Lets get to it. A buddy let me put the car up in his barn. He also has an S52 car. It needs a bit of love.
The first thing to do was remove the entire exhaust, heat shield and the X brace under the engine. Then I disconnected the drive-shaft.
The next step was to completely forget about taking pictures and focus on remvoing the transmission. It took some time to figure out but the key is pitching the engine&transmission backwards and using really long extensions. This seems to be the best way to disconnect the bell housing from the engine.
First off, the rattling noise inside the transmission was the piston from the exploded slave cylinder. It was way bigger than I thought it was. There were many metal bits to clean out. I put it next to a 10mm socket for context.
As for the damage it caused...some yes. Look how beat up the back of the pressure plate was.
The other victim here were some of the support fins. Two of them got pretty chewed up. Look past the spline shaft.
From here I decided to pretend that everything would be fine and continued. First things first. Shifter detents. This service, while a bit intimidating at first, was really not that bad at all.
I forgot to take pictures, but after this I put a new fork, pivot pin, throw-out bearing, input seal and cover to the inside of the bell housing.
Then I removed the clutch assembly. It was here that I decided to order a new flywheel.
Definitely some interesting wear happening here. The clutch itself was toast as well.
Still more dissassebly to go. I should mention just how slimy and grimy the oil pan and transmission were. The oil pan gasket had failed some time ago and the under side of the car was absolutely filthy. I spent quite a bit of time cleaning. Anyway, I had to brace the engine so it wouldn't fall on me while I removed the front subframe crossmember in order to gain enough clearance to pull the oil pan.
A bunch of bolts later and it's off! This is after I cleaned it up, but overall not too bad! No scary sparkles or anything too concerning.
I bought a wire nut to replace the existing oil nut sprocket. Apparently they can walk off randomly. Seemed like good insurance so I replaced the nut and tied it to one of the arms of the sprocket. All of this is off picture because I'm a terrible photographer.
Yep...25cm to the right and you would see it. Oh well. You can see how bad the original gasket was. Most of it is still sticking to the engine in this picture. I had to spend a good amount of time cleaning this up being careful not to gauge the aluminium.
I started working my way backwards from here. I put the new pan back in, along with a new seal for the oil dipstick. That's an important bit. Then I went to the rear of the engine. This part was awesome. I used a few slices of bread to push out the pilot bearing. Cleaned up as it went! I can't believe how well this worked. Push bread into the center and keep hammering it in with a socket extension. Keep adding bread until it begins to push the bearing out. Worked so well. So, new bearing, rear main seal and gasket. Done.
After that I added the new clutch assembly and flywheel. All new hardware used.
Moving back to the transmission itself. I decided I would do as much of the shifter linkage outsdie the car as I could to make life easier for me. Look at the difference before and after the new shifter rod coupler is. I don't remember what it's called. The bushing inside it was completely gone.
Do you have a vibration when you accelerate? Check out your drive shaft flex disc/guibo. Cracks are bad. Here's the one I replaced.
I guess this is where I apologize and got so excited I stopped taking pictures. Everything went back together fairly smoothly. I installed the DSSR as the only real upgrade to the shifter pushings other than a poly pivot (point? bushing? whatever.)
Let me tell you the combination of the new detents, bushings and the dssr have made a WORLD of difference. I have to learn how to drive the car again. The clutch engagement feels about the same, but I should probably adjust it a bit since it catches near the end of the clutch pedal travel.
Everything feels tightened up. Very happy with this and glad I have it out of the way. Also happy to report no fluids have escaped the new gaskets as far as I can tell.