Time for an overhaul of my 1.9 '98 BMW Z3 Individual

DrWong

Zorg Guru (III)
Joined
May 8, 2017
Points
125
Model of Z
3.0i
so that forced me to turn my attention to the sill again... this time I took @DrWong s and @Althulas advice and went right back to bright steel.....I'm actually thinking/hoping ? I might actually save the jacking point and get a patch butt welded in ?... it's the lighting but that definitely shiny (where it's not pitted !) =))


1693066532449.png

1693066616324.png
That's more like it mate - much better! All the black stuff that's left is what the Deox will now attack.

It's worth pulling out the prestal cages that the screws for the outer sills go into, as likely to be rust behind them. They come out dead easy if you can get a hook behind it. It's one of the things that always gets me about the Redish videos, cos they always leave them in.

I didn't take them out the first time I did the sills and rust started spreading from some of them. Did some remedial work a year later and they've been fine since.

Subframe looks amazing!
 

Matt Barnes

Zorg Guru (II)
Supporter
British Zeds
Joined
Jul 18, 2020
Points
123
Location
Portchester, Fareham
Model of Z
1998 BMW Z3 Individual 1.9 M44 B19
That's more like it mate - much better! All the black stuff that's left is what the Deox will now attack.

It's worth pulling out the prestal cages that the screws for the outer sills go into, as likely to be rust behind them. They come out dead easy if you can get a hook behind it. It's one of the things that always gets me about the Redish videos, cos they always leave them in.

I didn't take them out the first time I did the sills and rust started spreading from some of them. Did some remedial work a year later and they've been fine since.

Subframe looks amazing!
good tips mate thank you...yeah I was shocked how well the subframe came out...apart from the seams and the inside where the diff sits there was only surface rust..those poly scuff discs are a game changer..I'll try and get the prestal cages out when I'm next under there...cheers !!
 
Last edited:

Matt Barnes

Zorg Guru (II)
Supporter
British Zeds
Joined
Jul 18, 2020
Points
123
Location
Portchester, Fareham
Model of Z
1998 BMW Z3 Individual 1.9 M44 B19
Bit of Segway.. DREMEL TIME !.... we all know how important a good dremelling is!... After mine packed up causing me a near heart attack as I've come to rely on it so much.. I decided to pull it apart...

did a continuity test on both coils... one was fine, the other side of the stator was dead....

1693555562647.png

managed to unhook the connector and saw one end of the wire to the connector had come off....

1693555658987.png


managed to unwind one loop of the stator coil to make a new connection

1693555814027.png


connected the pin connector back on, trimmed off the excess... tested it and got good continuity again !...put it all back together, Dremel now working again !! phew !!

1693555957557.png
 

Mint

Zorg Expert (I)
Supporter
British Zeds
East Anglian Crew
Joined
Sep 23, 2012
Points
222
Location
Stafford
Model of Z
2.2 & 3.0 Sport
Bit of Segway.. DREMEL TIME !.... we all know how important a good dremelling is!... After mine packed up causing me a near heart attack as I've come to rely on it so much.. I decided to pull it apart...

did a continuity test on both coils... one was fine, the other side of the stator was dead....

View attachment 274997
managed to unhook the connector and saw one end of the wire to the connector had come off....

View attachment 274999

managed to unwind one loop of the stator coil to make a new connection

View attachment 275001

connected the pin connector back on, trimmed off the excess... tested it and got good continuity again !...put it all back together, Dremel now working again !! phew !!

View attachment 275003
Always a good feeling to mend something:thumbsup:
I take the view that if it is already broken I can't make it any worse but could save a few bob attempting to repair it.
 
Last edited:

Matt Barnes

Zorg Guru (II)
Supporter
British Zeds
Joined
Jul 18, 2020
Points
123
Location
Portchester, Fareham
Model of Z
1998 BMW Z3 Individual 1.9 M44 B19
Always a good feeling to mend something:thumbsup:
I take the view that if it is already broken I can't make it any worse but could save a few bob attemting to repair it.
exactly.... you can buy replacement Stators for about 14 quid....but where's the fun in that !?...new Dremel is about 50 quid... I'd rather spend that on Z3 parts or materials !! :D
 

DrWong

Zorg Guru (III)
Joined
May 8, 2017
Points
125
Model of Z
3.0i
Very impressive. Also prefer to attempt repairs on anything myself (cos I'm a tight northerner), but am generally baffled by anything to do with electrickery. Did recently manage to replace the PCB in my boiler myself though, which saved me a few squids.

The DIY mentality certainly helps if you drive a Z3, unless you have deep pockets.!
 

Matt Barnes

Zorg Guru (II)
Supporter
British Zeds
Joined
Jul 18, 2020
Points
123
Location
Portchester, Fareham
Model of Z
1998 BMW Z3 Individual 1.9 M44 B19
Very impressive. Also prefer to attempt repairs on anything myself (cos I'm a tight northerner), but am generally baffled by anything to do with electrickery. Did recently manage to replace the PCB in my boiler myself though, which saved me a few squids.

The DIY mentality certainly helps if you drive a Z3, unless you have deep pockets.!
I have a degree in electronic engineering but it was all theory and formulas...I'm relatively handy with electrics (home electrics etc)..but as we're among friends...I confess I saw this fix on a youtube video..and just went.."of course!..you idiot!"..and just did the same thing...
 

Matt Barnes

Zorg Guru (II)
Supporter
British Zeds
Joined
Jul 18, 2020
Points
123
Location
Portchester, Fareham
Model of Z
1998 BMW Z3 Individual 1.9 M44 B19
Afternoon.... well after deciding to jet wash the patio, while it was all out, I decided to jet wash under the car.. get rid of all the grime....

1693670130092.png

1693670162432.png


and then jet wash the tank.....I still have the vent pipe connected as I'm not sure yet how the black plastic connector comes off

1693670258296.png


now it's at this point I really need your help... because I have no arse end.. I want to get the back end higher, so I can get the jack stands on the chassis rails and jack up the front... this is the method I've thought of to jack up the back when there's no Diff.... do you reckon this is okay? as long as I'm not under it when I'm lifting... I think it should be ok ?... and then put jack stands on the chassis rails behind the wood ?

1693670510186.png
 

Matt Barnes

Zorg Guru (II)
Supporter
British Zeds
Joined
Jul 18, 2020
Points
123
Location
Portchester, Fareham
Model of Z
1998 BMW Z3 Individual 1.9 M44 B19
another day in the garage..... think I might have gotten a little carried away removing the surface rust from the subframe =))

1693749094258.png


after I got it lovely and shiny... I decided to give POR15 a go.... I'd had already bought it so it was a bit of a trial....

it is a bit of a faff as you have to keep it wet for 20 minutes.... I've not kept anything wet that long since my 30s ! =))

1693749218551.png


after 20 minutes you're then supposed to wash it off thoroughly... I did made the mistake of letting it dry... and I got yellow discolouration...actually it looks worse now!.. but hopefully now have a zinc coating.

1693749462198.png


while that was doing it's thing.. I washed off the De-OX Gel from the Sill that had been on there for two weeks and started grinding that down with polycarbide discs....I actually got it so it looked like chrome in places !!.... I'm hesitant to grind it all smooth as that's taking out a lot of material ?

1693749509861.png


I used POR15 again on here... but this time didn't let it dry.... seemed a bit better than the subframe....looks a lot more dull now... but hopefully that's now a protective layer of zinc phosphate...

1693749665915.png
 

DrWong

Zorg Guru (III)
Joined
May 8, 2017
Points
125
Model of Z
3.0i
You're right, insofar as if you want to grind the dark pitted areas away, you'll also have to grind the surrounding good metal to the same depth as well. That's what the Deox is for, but I think you need quite a few more cycles of applications. Mine weren't as bad as yours and took six weeks to get to the stage in the photo below, with each gel application staying on for about two-three days, before wire-brushing, cleaning off with water, and then applying/taping up fresh gel.

1693772887327.png
 

Matt Barnes

Zorg Guru (II)
Supporter
British Zeds
Joined
Jul 18, 2020
Points
123
Location
Portchester, Fareham
Model of Z
1998 BMW Z3 Individual 1.9 M44 B19
You're right, insofar as if you want to grind the dark pitted areas away, you'll also have to grind the surrounding good metal to the same depth as well. That's what the Deox is for, but I think you need quite a few more cycles of applications. Mine weren't as bad as yours and took six weeks to get to the stage in the photo below, with each gel application staying on for about two-three days, before wire-brushing, cleaning off with water, and then applying/taping up fresh gel.

View attachment 275263
thanks mate..... yeah I'll have another crack this weekend..... I was thinking of my holes and that my holes may be small enough to plug weld?... evidently you can do it in layers and work your way down the hole. I saw a youtube video of a guy plug welding a hole bigger than mine by slowly over time closing the edges of the hole until it was completely filled...dunno

1694100600380.png
 

Attachments

IainP

Zorg Guru (II)
British Zeds
Joined
Feb 20, 2019
Points
119
Location
Out of my Tree, North of Perth, Scotland
Model of Z
1.9
You can plug weld, or spiral weld, holes like that. But, it’s not easy and it puts loads of heat in, though that shouldn’t really matter being the inner sill. A copper block, or a 2p coin makes it easier.
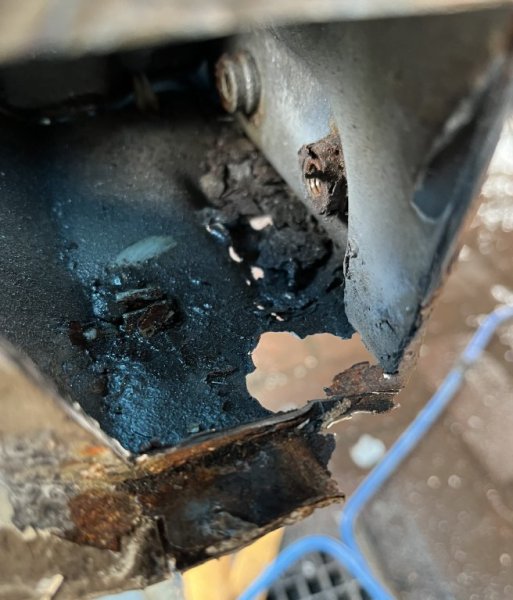
Those pits though, that steel should be 2mm thick, where the pits are will be below 1mm, if ‘twer mine i would cut it and insert a piece of new metal. Would be quicker.
Stick a finger in the jack point and see how rusty it is on the inside.
This was mine


IMG_4608.jpeg
 

DrWong

Zorg Guru (III)
Joined
May 8, 2017
Points
125
Model of Z
3.0i
Can't advise on welding I'm afraid, as have no experience of it. Have seen similar on Youtube though, with fabricators closing holes up with weld.

Can you weld? Are you gonna have a go yourself??
 

IainP

Zorg Guru (II)
British Zeds
Joined
Feb 20, 2019
Points
119
Location
Out of my Tree, North of Perth, Scotland
Model of Z
1.9
Plug, or spiral, welding is not something to start on. It’s a fantastic way to make small holes bigger if you get the initial amperage or time wrong. Also it will spark, Lots, it’s a wonderful way of starting off a weld burn collection.
I’ve never attempted it with flux core, but I can turn my Portamig down to 15amps, turn up the gas and pulse weld just outside the hole, then pulse weld, at higher amps, in a spiral into the middle. A series of very short tack welds really, chilling periodically with an airline. Though a wet cloth would work.
 

Matt Barnes

Zorg Guru (II)
Supporter
British Zeds
Joined
Jul 18, 2020
Points
123
Location
Portchester, Fareham
Model of Z
1998 BMW Z3 Individual 1.9 M44 B19
You can plug weld, or spiral weld, holes like that. But, it’s not easy and it puts loads of heat in, though that shouldn’t really matter being the inner sill. A copper block, or a 2p coin makes it easier.
Those pits though, that steel should be 2mm thick, where the pits are will be below 1mm, if ‘twer mine i would cut it and insert a piece of new metal. Would be quicker.
Stick a finger in the jack point and see how rusty it is on the inside.
This was mine


View attachment 275987
thanks @IainP .. The jacking point is rock solid..it's just those two areas which must be where water's settled..thanks for the advice I'll have a think
 

Matt Barnes

Zorg Guru (II)
Supporter
British Zeds
Joined
Jul 18, 2020
Points
123
Location
Portchester, Fareham
Model of Z
1998 BMW Z3 Individual 1.9 M44 B19
Can't advise on welding I'm afraid, as have no experience of it. Have seen similar on Youtube though, with fabricators closing holes up with weld.

Can you weld? Are you gonna have a go yourself??
I've never welded but thinking of getting a flux core welder as they don't need gas..thought this would be a good test case
 

Matt Barnes

Zorg Guru (II)
Supporter
British Zeds
Joined
Jul 18, 2020
Points
123
Location
Portchester, Fareham
Model of Z
1998 BMW Z3 Individual 1.9 M44 B19
thanks @IainP .. The jacking point is rock solid..it's just those two areas which must be where water's settled..thanks for the advice I'll have a think
I really want to do everything on this myself so I learn new skills..I've never done any of this stuff before and I've learnt so much doing the Z3... if it means chopping out something the size of a credit card and welding in a new piece then I'm happy to give it a go
 

DrWong

Zorg Guru (III)
Joined
May 8, 2017
Points
125
Model of Z
3.0i
If it was me, I'd be leaning towards giving it a go myself tbh. Always wanted to learn welding but never had a reason to - but you do! If you fk it up, just get a professional in, i.e. you'd just be back to where you started, no drama etc.

Doooo ittttt! Happy to be your enabler here hahaha
 

IainP

Zorg Guru (II)
British Zeds
Joined
Feb 20, 2019
Points
119
Location
Out of my Tree, North of Perth, Scotland
Model of Z
1.9
This is nearly the way I do it, my mig is modified to go super low so I can do a series of small tacks, then tack inwards in a spiral depending on how bit the holes is

View: https://youtu.be/bdnm1fG2Dao?si=DQPw5WrVONO2_DGw


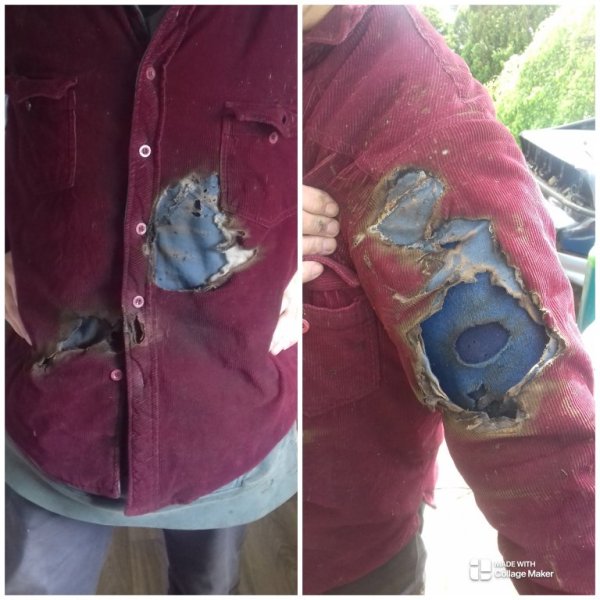
Dont wear anything melty or flammable, or a flammable lining, ‘cos this happens.

IMG_5109.jpeg
A baseball cap reversed stops zapping the top of your head, back of the neck.
 

Matt Barnes

Zorg Guru (II)
Supporter
British Zeds
Joined
Jul 18, 2020
Points
123
Location
Portchester, Fareham
Model of Z
1998 BMW Z3 Individual 1.9 M44 B19
so it was back on the sills today.... hot one as well... hadn't spent a lot of time on the passenger side for a while... so stripped off the plastic... looks worse than it is.. they aren't holes

1694267617560.png

1694267644468.png


so set about grinding with the knotted wheel and polycarbide discs and got to this ...

1694267706414.png

1694267727600.png


Then decided to attack the rear ends of the sills... and channelled my inner @DrWong

1694267780479.png

1694267798841.png


on the driver's side..really got in there and picked out the seam sealer as much as I could.. .noticed a small rectangular hole... it looked so uniform it looks almost factory !!

1694267817000.png

1694267838615.png


then hit the rear of the Driver's side sill

1694267885825.png

1694267930072.png


then it was time for more Deox Gel and taping up..

1694267978435.png

1694267995975.png


things to do going forward.. I REALLY need to get the front wheels off the floor.....I'm nervous about lifting the front when the rear's on axles as I can't get to the sump or anything central... and I don't want to jack from the side in case it tips..... open to suggestions on how I can move the jacks to the chassis rails ....
 
Last edited:
Top