Not to shabby at all.
Seemed like a good idea at the time!
- Thread starter IainP
- Start date
Once dry the carpets look fantastic. Not as new, but not far off. Only problem is where to put the damn things, not taking them back down to put in the car. I have things I want done that need them out.
Another prop arrived, the front of that will need shortened and balanced when I figure out how much longer the 6 speed box is.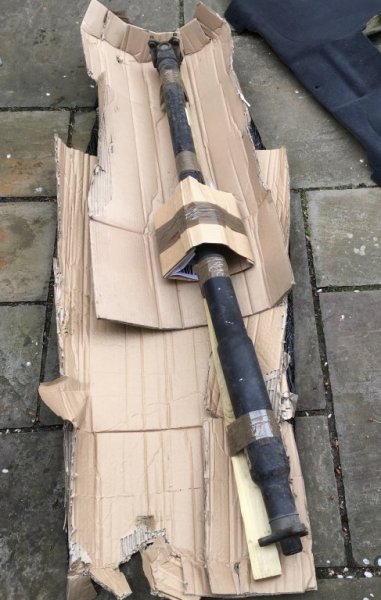
Need to get the airbag light off, except I now also have the asc and pad wear lights on too. The pad wear turned out to be a broken rear sensor, which was weird since I hadn’t been near it.
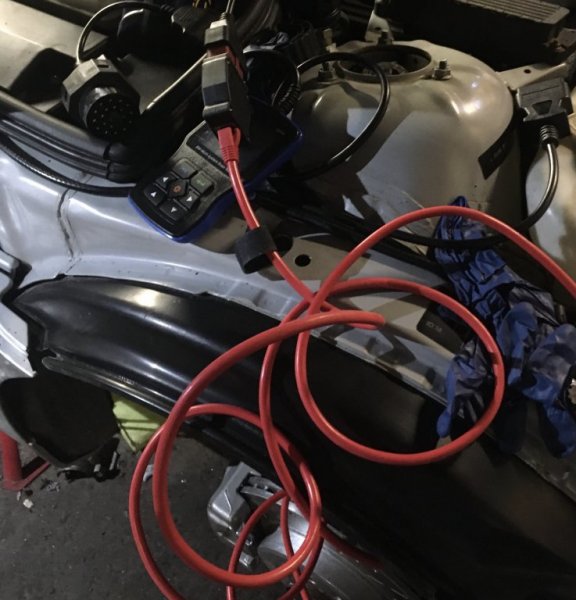
The car only has the under bonnet connector, tried a variety of scanners, none would connect.
Spoke to the super helpful Carl at www.northernautotech.co.uk who had a variety of BMW Z ecu on his bench. He managed to reset it, had 3 events recorded which, after discussion, were likely shorts from water under the seats and probably the steering wheel. I sent him another from eBay as he could clone the original. £80 all in, including all the recorded delivery twice, I think that’s not bad at all.
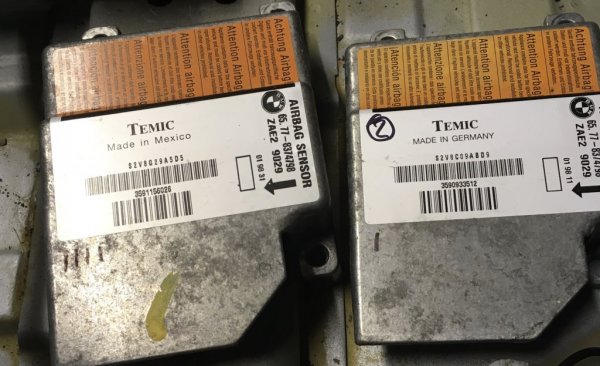
The hash marks are how many times the ignition has been on.
Original on the left, light was on and the scanner still gave a connection error. Tried 4 times, as you can see, nothing. Tried the clone and bingo, light went off, but, I still had a connection error. Who cares though, the light was off. Until I disconnected the battery. Soon as it was reconnected the bloody light came back on. Bought resistors and fitted them to the seat connectors. Light still on, thought, I’ll try the airbag and found the horn now doesn’t work either. So the slip ring is now the likely culprit.
Bought a s/h laptop to dual boot, then install inpa and Jaguar’s sdd, the abs on the Jag is also kicking my arse.
Spoke to Furniture clinic and ordered leather colour BMW Montana Tanin red and a few other things.
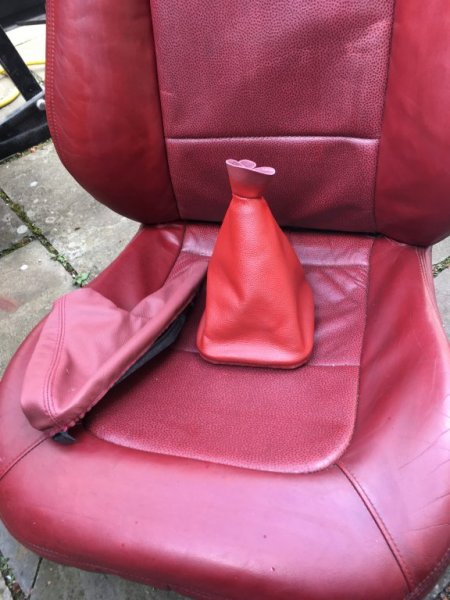
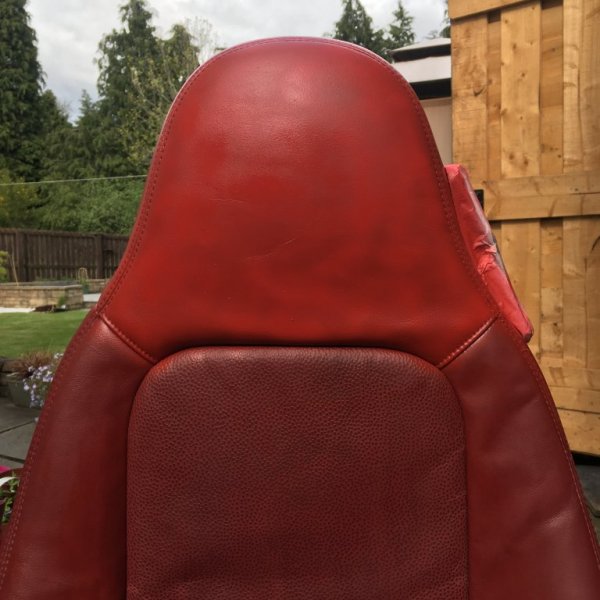
Fired up the airbrush and Ooops! My tanin red seat isn’t tanin red. The new hand brake and gear lever tanin red covers don’t match either the seat, or the colouring agent. Feck it, just colour everything.
 I
I
I thought I had a pic of the black seat, needs another coat, but looks great.
I the need to make the mechanism work, the covers on both switches are broken off and one of the pins is broken on the drivers seat. Bought a few rocker switches, fairly easy to set up.
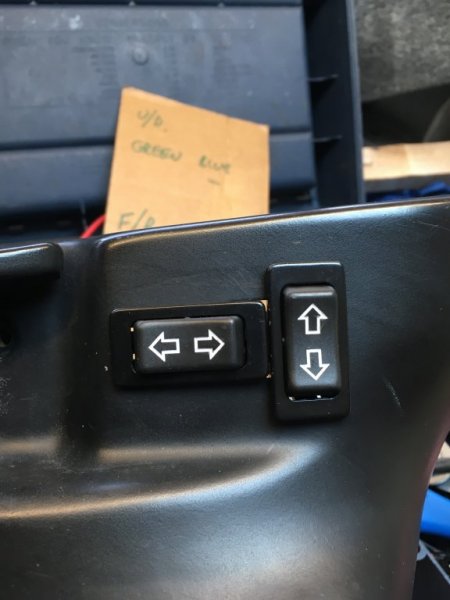
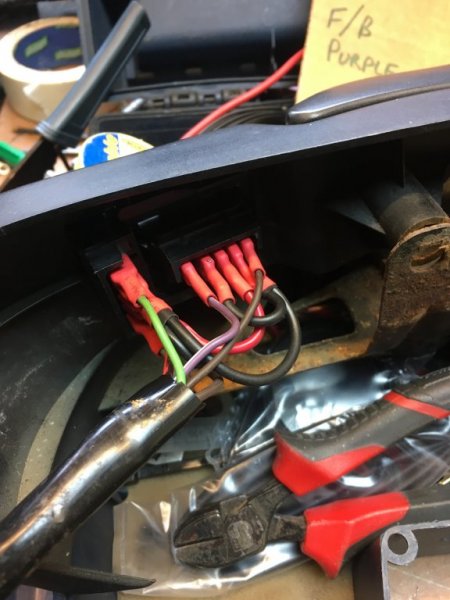
Have you spotted the grevious error though? I completely forgot where the seat has to go!
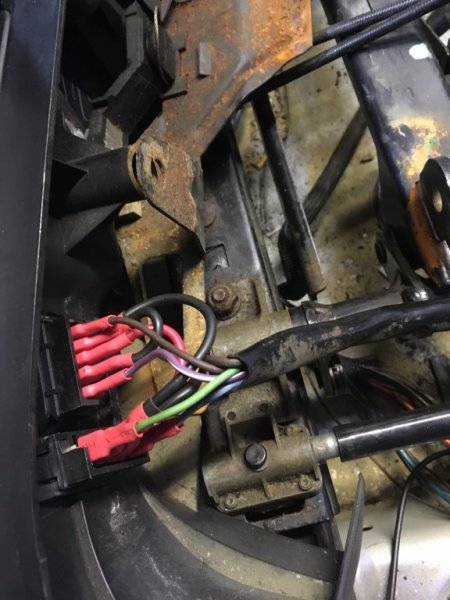 I
I
I need to see if I can get some flag connectors (right angle), either that or I relocate the switches.
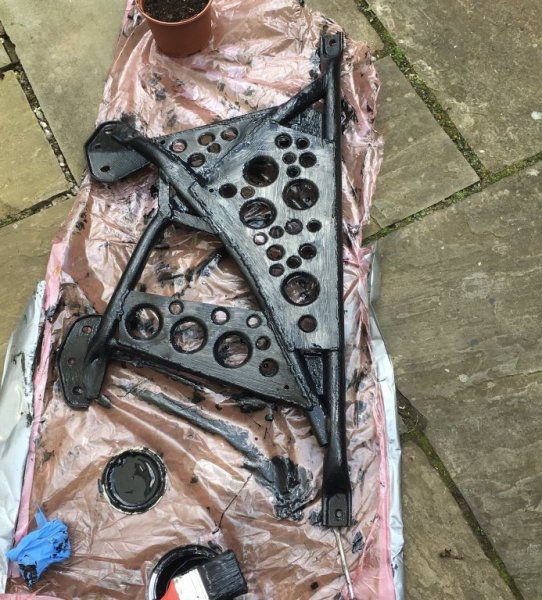
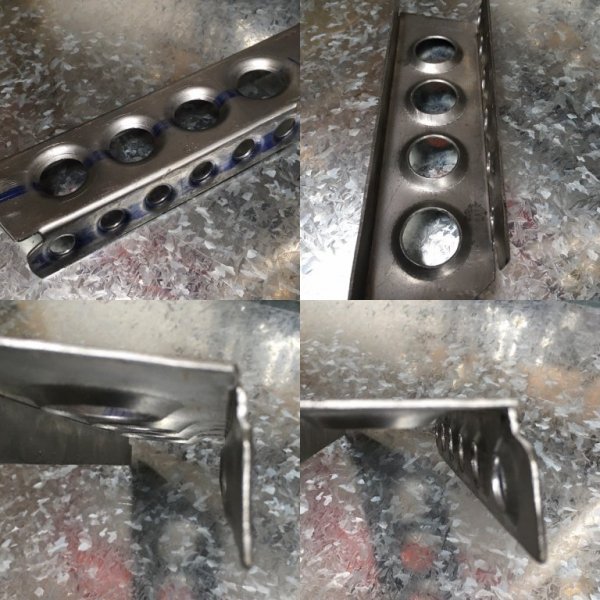
I had a new roller for the mig arrive, so I had a play with the welder and some scrap offcuts. It’s only 1mm sheet and no one will see it except the Mot tester, went a bit mental with the dimple dies, just for a . I really don’t like that Ronseal metal paint though. Took about half a dozen coats and shows all the brush strokes.

All change at this point now.
My father in law has passed away so the main focus has to be getting his Jag mot’d. My Ignis Sport should hopefully leave tomorrow, much to my wife’s delight, she hates it. Leaves a space on the drive, so the Z will be transported up. I was planning on using www.transporterhire.co.uk
Used them successfully several times in the past. Looks like the lockdown has put the Glasgow location out of business which is a shame. Shiply now seems favourite. One of the benefits will be sticking one of my stored engines in the passenger footwell for transport. Getting it back out, that’s always an adventure. Getting it into my already chock full garage, and the other engine stored in Airdrie, not quite sure how I’m going to manage that. I think a massive parts cull is in the cards.
Another prop arrived, the front of that will need shortened and balanced when I figure out how much longer the 6 speed box is.

Need to get the airbag light off, except I now also have the asc and pad wear lights on too. The pad wear turned out to be a broken rear sensor, which was weird since I hadn’t been near it.
The car only has the under bonnet connector, tried a variety of scanners, none would connect.
Spoke to the super helpful Carl at www.northernautotech.co.uk who had a variety of BMW Z ecu on his bench. He managed to reset it, had 3 events recorded which, after discussion, were likely shorts from water under the seats and probably the steering wheel. I sent him another from eBay as he could clone the original. £80 all in, including all the recorded delivery twice, I think that’s not bad at all.

The hash marks are how many times the ignition has been on.
Original on the left, light was on and the scanner still gave a connection error. Tried 4 times, as you can see, nothing. Tried the clone and bingo, light went off, but, I still had a connection error. Who cares though, the light was off. Until I disconnected the battery. Soon as it was reconnected the bloody light came back on. Bought resistors and fitted them to the seat connectors. Light still on, thought, I’ll try the airbag and found the horn now doesn’t work either. So the slip ring is now the likely culprit.
Bought a s/h laptop to dual boot, then install inpa and Jaguar’s sdd, the abs on the Jag is also kicking my arse.
Spoke to Furniture clinic and ordered leather colour BMW Montana Tanin red and a few other things.
Fired up the airbrush and Ooops! My tanin red seat isn’t tanin red. The new hand brake and gear lever tanin red covers don’t match either the seat, or the colouring agent. Feck it, just colour everything.

 I
II thought I had a pic of the black seat, needs another coat, but looks great.
I the need to make the mechanism work, the covers on both switches are broken off and one of the pins is broken on the drivers seat. Bought a few rocker switches, fairly easy to set up.


Have you spotted the grevious error though? I completely forgot where the seat has to go!
 I
II need to see if I can get some flag connectors (right angle), either that or I relocate the switches.
I had a new roller for the mig arrive, so I had a play with the welder and some scrap offcuts. It’s only 1mm sheet and no one will see it except the Mot tester, went a bit mental with the dimple dies, just for a


All change at this point now.
My father in law has passed away so the main focus has to be getting his Jag mot’d. My Ignis Sport should hopefully leave tomorrow, much to my wife’s delight, she hates it. Leaves a space on the drive, so the Z will be transported up. I was planning on using www.transporterhire.co.uk
Used them successfully several times in the past. Looks like the lockdown has put the Glasgow location out of business which is a shame. Shiply now seems favourite. One of the benefits will be sticking one of my stored engines in the passenger footwell for transport. Getting it back out, that’s always an adventure. Getting it into my already chock full garage, and the other engine stored in Airdrie, not quite sure how I’m going to manage that. I think a massive parts cull is in the cards.
Robert Hill
Zorg Guru (III)
- Joined
- Sep 17, 2018
- Points
- 125
What a Hero to travel 400 miles in a top down z3 in winter and saved a zed from the scrap yard
 nice
nice
It actually wasn’t that bad, didn’t get close to freezing until the border.
Using my body warmer to keep the warm air in the footwell, has given me the idea to make some sort of ‘skirt thing’. Maybe Velcro to the dash.
Coupled with heated seats I’ll be super toasty.
Using my body warmer to keep the warm air in the footwell, has given me the idea to make some sort of ‘skirt thing’. Maybe Velcro to the dash.
Coupled with heated seats I’ll be super toasty.
My Ignis Sport went on Sunday, so space on the drive for the Z.
Tried yet another BMW specific scanner and it can’t access the airbag ecu either.
Tried from the laptop and there’s something not configured properly. Disconnected the airbag ecu. It can get transported like that.
Fixed the Jaaag though, problem was the new abs sensor replaced last service (not by me).
The boot is now full of trim, quite surprised how much, hope I remember where it all goes.
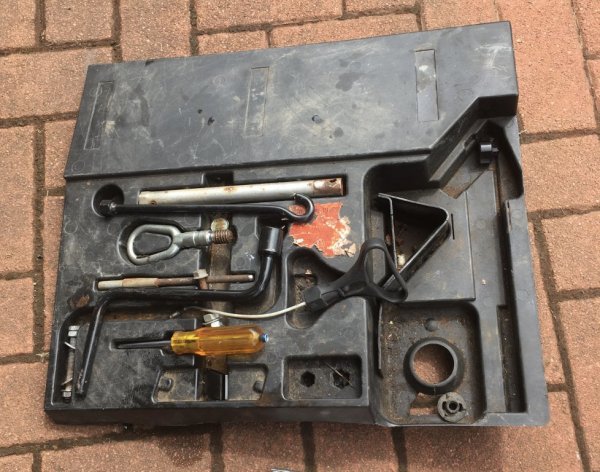
Decided this abomination is going in the skip, pointless waste of space. I can put all the tools in a roll in the corner and free up maybe 5-6L of space. Doesn’t sound much,but sometimes I carry mountains of stuff.
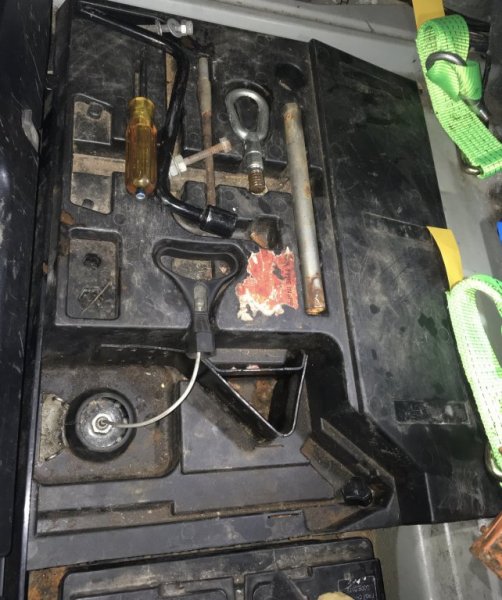
Getting rid of that tray will give a flat floor too, much neater. Something else to make, floor panel and insulated battery cover.
Tried yet another BMW specific scanner and it can’t access the airbag ecu either.
Tried from the laptop and there’s something not configured properly. Disconnected the airbag ecu. It can get transported like that.
Fixed the Jaaag though, problem was the new abs sensor replaced last service (not by me).

The boot is now full of trim, quite surprised how much, hope I remember where it all goes.
Decided this abomination is going in the skip, pointless waste of space. I can put all the tools in a roll in the corner and free up maybe 5-6L of space. Doesn’t sound much,but sometimes I carry mountains of stuff.

Getting rid of that tray will give a flat floor too, much neater. Something else to make, floor panel and insulated battery cover.
Would you believe that was once a black seat?

The X type flew through its Mot and came up with me to polish clean and sell. The Z came down off axle stands and made its way outside. The last time it was behind the X it was being towed.
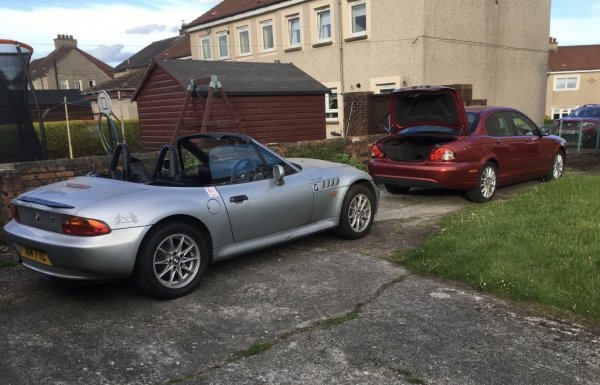
That spoiler thing is so unbelievably hideous! I absolutely love it!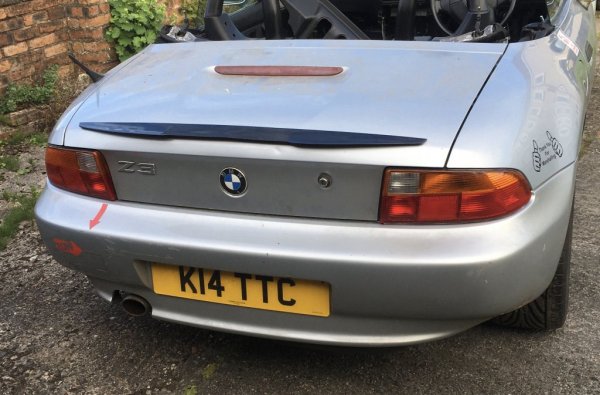
This little bag arrived from Custom Covers. Contains a waterproof hood cover.

First though I had to load this engine for transport up. I must be getting weak in my old age, struggled to get it in there on my own, Suzuki M15a Ignis Sport motor for another project.

Up with the hood and I tried the cover. Very neat design, once it’s on it can’t be dislodged or stolen. Locked in place by the bonnet and boot lid, sides are held down my magnets. Very impressed.
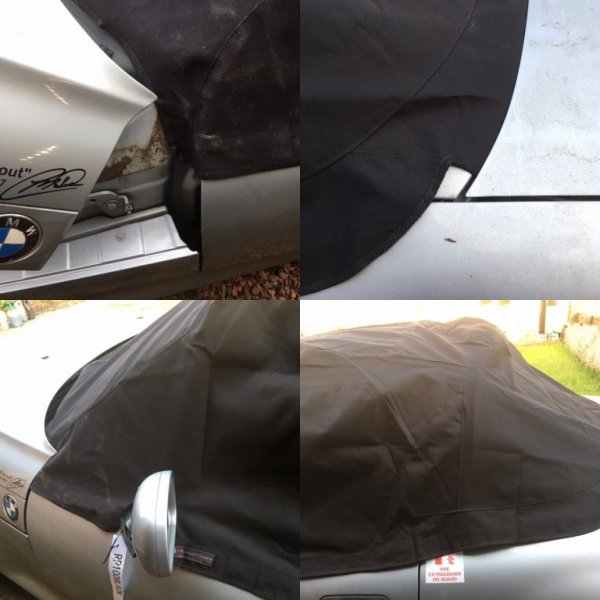

It looks a bit baggy, it’s just because I’ve pretty much thrown it on as a trial fit. Very well made.
Will look at a trip to Swansea maybe late Sept/early October. Too many things on before then.
House needs to be emptied by 21st, so Z will come up just before then. Need to get the X advertised, and have a Hillclimb next weekend, so that’s 3 1/2 days accounted for.

The X type flew through its Mot and came up with me to polish clean and sell. The Z came down off axle stands and made its way outside. The last time it was behind the X it was being towed.

That spoiler thing is so unbelievably hideous! I absolutely love it!

This little bag arrived from Custom Covers. Contains a waterproof hood cover.

First though I had to load this engine for transport up. I must be getting weak in my old age, struggled to get it in there on my own, Suzuki M15a Ignis Sport motor for another project.

Up with the hood and I tried the cover. Very neat design, once it’s on it can’t be dislodged or stolen. Locked in place by the bonnet and boot lid, sides are held down my magnets. Very impressed.


It looks a bit baggy, it’s just because I’ve pretty much thrown it on as a trial fit. Very well made.
Will look at a trip to Swansea maybe late Sept/early October. Too many things on before then.
House needs to be emptied by 21st, so Z will come up just before then. Need to get the X advertised, and have a Hillclimb next weekend, so that’s 3 1/2 days accounted for.
Busy, busy week, lots of little bits arrived, seats were sprayed with sealer.
Played Clio Tetris at the hillclimb
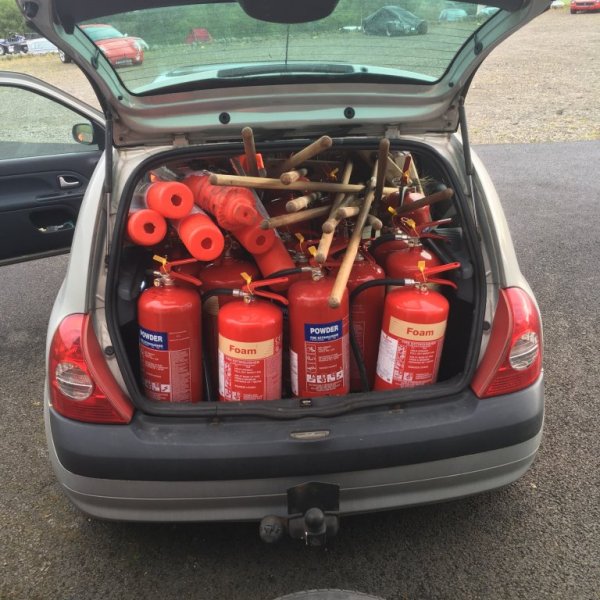
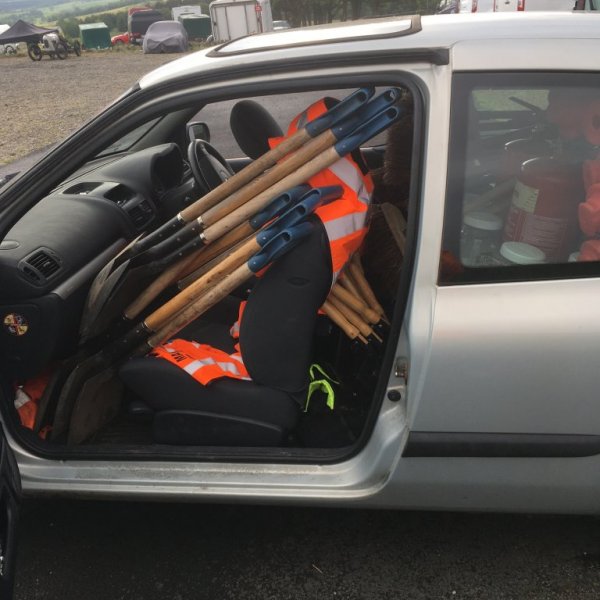
But.
Important delivery this morning, BigChris from Shiply has just dropped off the Z, so now I have 2 project cars on the drive to annoy the wife, (and neighbours!) with.
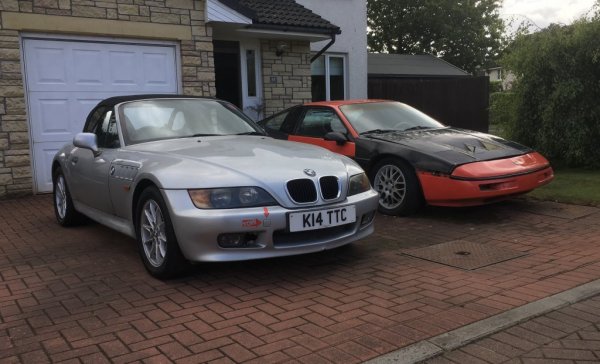
Probably going to take me two nights to unpack all the stuff it’s filled with. Big Chris’ mate “is that an engine in the passenger side under all that stuff?”
It is indeed sir, and I have no idea how I’m going to get it back out. That’s not a joke, I really don’t.
Played Clio Tetris at the hillclimb


But.
Important delivery this morning, BigChris from Shiply has just dropped off the Z, so now I have 2 project cars on the drive to annoy the wife, (and neighbours!) with.

Probably going to take me two nights to unpack all the stuff it’s filled with. Big Chris’ mate “is that an engine in the passenger side under all that stuff?”
It is indeed sir, and I have no idea how I’m going to get it back out. That’s not a joke, I really don’t.
Mates who know you too well are Bastards, they really are, but more on that later.
I was sent this:
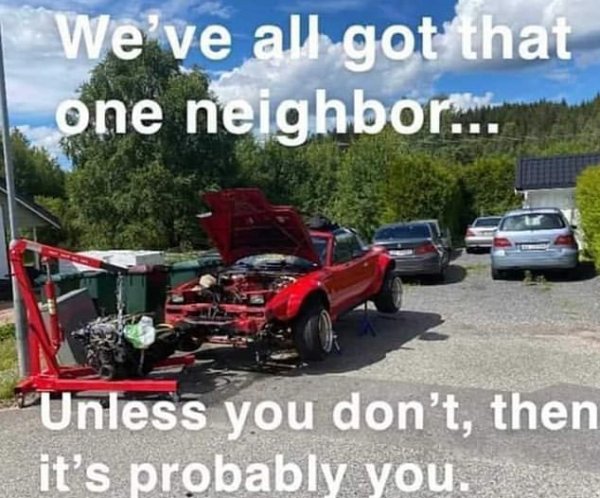
And it is, it really is me.
Best of it is, I live in a cul de sac. The first house, the most visible house, the one everyone HAS to drive past. The one that completely restored a Mini in the drive, erecting a pop up gazebo at weekends, with a tarpaulin connected to the eaves of the house, so we could weld in the Scottish summer.
That house.
The house that had an E36 Touring in the drive last year, two feet up in the air, sitting on a big blue tarpaulin, so the back end and tank could be dropped out, reinforced, rebuilt, and every orifice injected with waxoyl.
That house.
That’s me.
And now I have a Z3 to hoist in the air and hopefully do the complete rear end over 4 days next weekend.
Amazingly, the neighbours still talk to me!
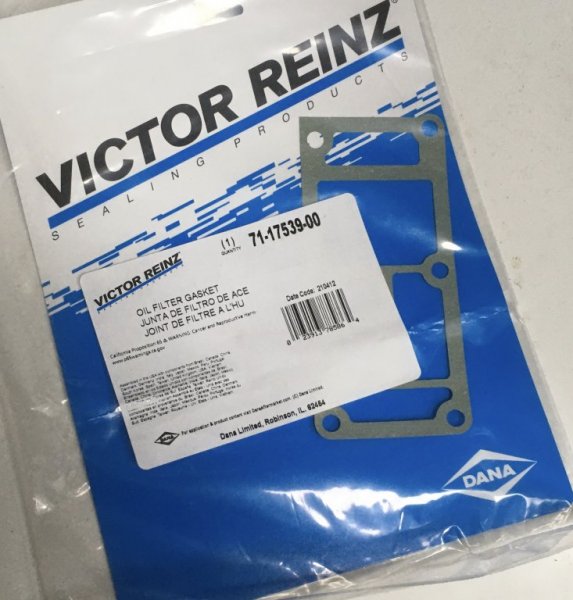
Rockauto in the States had a special on parts, so five oil filters are in the air somewhere and this gasket arrived today, £2, I really need to cure all the oil leaks.
Stainless centre box, yes, yes, I know the 1.9 is single pipe, mine won’t be. The twin 1.75” pipes are near as makes no difference the same area, twin pipes into the biggest back box I can make from scratch.

So, why are mates bastards? A couple or three months ago he dropped off some pistons and rods to balance. And spotted the V10 throttle bodies I had lying about, “Those for the BMW?” “Nope, Fiero”, “so that leaves 6 spare then!”
A little research and
https://danstengineering.co.uk/ supplied this

The V10 bodies are a little larger
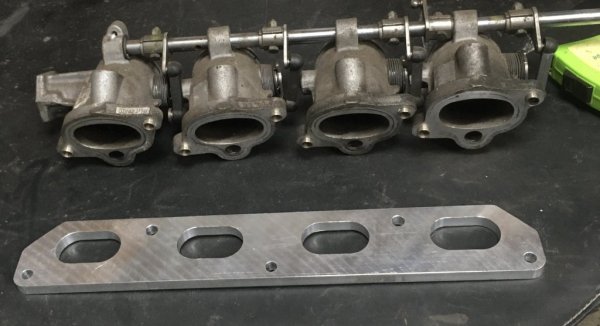
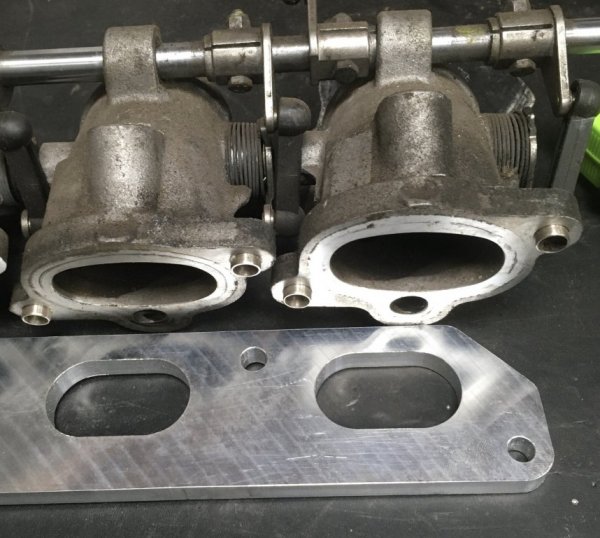
Which means a spacer, that’s not brain surgery, time consuming, not hard. An air box, that’s moulding, simple.
So he turns up with some Fraoch (look it up), I work cheap, to pick up the pistons and we’re looking over the Z. “Oh, you’re not going COP?” b*****d. . Again.
“You know there’s an engine on the bay for a ton in Bathgate?”
No, but I do now, which is why I was on Rockauto, checking the price of pistons and shells.
Mates are Bastards, they put ideas in your head.
I was sent this:

And it is, it really is me.
Best of it is, I live in a cul de sac. The first house, the most visible house, the one everyone HAS to drive past. The one that completely restored a Mini in the drive, erecting a pop up gazebo at weekends, with a tarpaulin connected to the eaves of the house, so we could weld in the Scottish summer.
That house.
The house that had an E36 Touring in the drive last year, two feet up in the air, sitting on a big blue tarpaulin, so the back end and tank could be dropped out, reinforced, rebuilt, and every orifice injected with waxoyl.
That house.
That’s me.
And now I have a Z3 to hoist in the air and hopefully do the complete rear end over 4 days next weekend.
Amazingly, the neighbours still talk to me!
Rockauto in the States had a special on parts, so five oil filters are in the air somewhere and this gasket arrived today, £2, I really need to cure all the oil leaks.

Stainless centre box, yes, yes, I know the 1.9 is single pipe, mine won’t be. The twin 1.75” pipes are near as makes no difference the same area, twin pipes into the biggest back box I can make from scratch.

So, why are mates bastards? A couple or three months ago he dropped off some pistons and rods to balance. And spotted the V10 throttle bodies I had lying about, “Those for the BMW?” “Nope, Fiero”, “so that leaves 6 spare then!”
A little research and
https://danstengineering.co.uk/ supplied this

The V10 bodies are a little larger


Which means a spacer, that’s not brain surgery, time consuming, not hard. An air box, that’s moulding, simple.
So he turns up with some Fraoch (look it up), I work cheap, to pick up the pistons and we’re looking over the Z. “Oh, you’re not going COP?” b*****d. . Again.
“You know there’s an engine on the bay for a ton in Bathgate?”
No, but I do now, which is why I was on Rockauto, checking the price of pistons and shells.
Mates are Bastards, they put ideas in your head.
Completely emptied all the crap in the boot today, quite surprised how much trim, junk and tools I had in there.
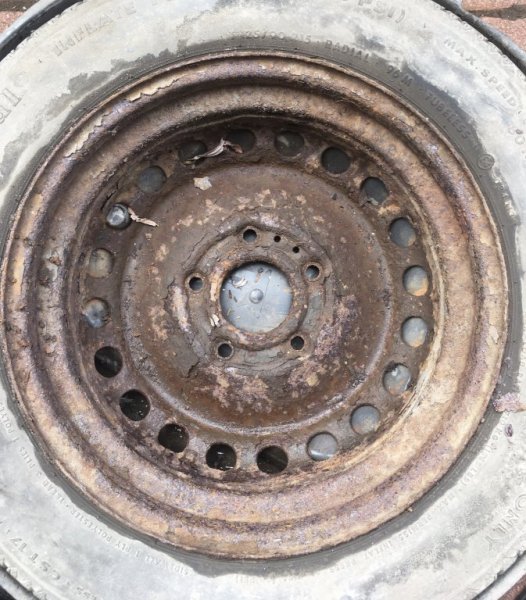
This is set aside to go to recycling, I’ll find a newer one I wouldn’t be scared to fit.
The tool tray thing came out easier than expected,
 to leave what is quite a lot more space,


Now I need to make pattern, actually two patterns, one for a battery cover and one for the floor. All the tools will go into rolls, far easier to store/access, and, you can lie on them if you have to.
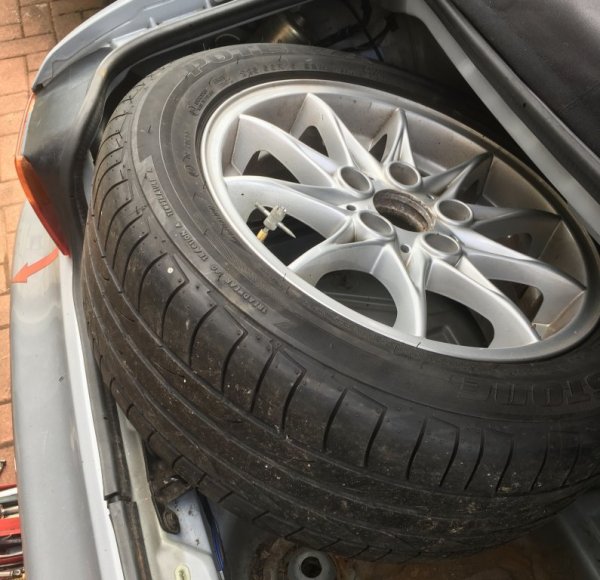
I had to try a wheel/tyre, it’s a 225, I reckon the original cars 205 section tyre would just fit.
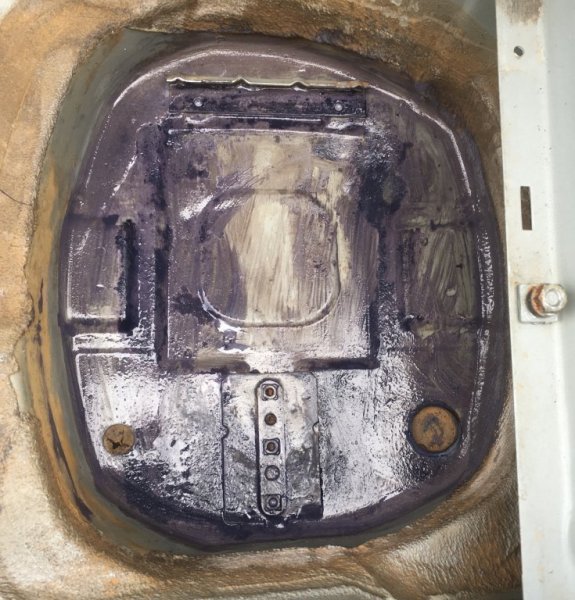
Strange that it’s set up for 3 sizes of battery.
Cleaned up and coated with Jenolite rust converter, I’ll overcoat with silver Smoothrite.
I’d bought oneof the little chrome lifter for the boot lock and went to fit it whilst I had the Jenolite out. Could I find my big step drill though? Nope. Job for another day.

The drivers door card was loose at the top, decided to remove both as I wanted to sort out the speaker covers, been painted silver, badly, with overspray everywhere. With my garage now jam packed with all the extra stuff from my father in law’s place, I couldn’t find my panel tool so had the quickly make one.
Top tip, if you have to use insulating tape, cut it, don’t tear it. Tear it and it stretches, then it doesn’t stick, unravels, makes a mess of your hands etc.
2nd Top tip, BMW use biscuit (really, that’s what it’s called), rather than the formed plastic, or hardboard, used by some other companies for door cards. If you lever with a screwdriver rather than something which fits both sides of the plastic stud it can break up.

I wanted to spray the leather to match the seats, almost just masked it, but noooo, I just had to be a smart arse and remove the leather panel. Muppet. It’s not on with screws, the plastic studs are melted on the reverse. A countersink bit made short work of it, that was when I realised the edge of the leather tucked under the trim piece above, that had to come off too. Should have just masked it.
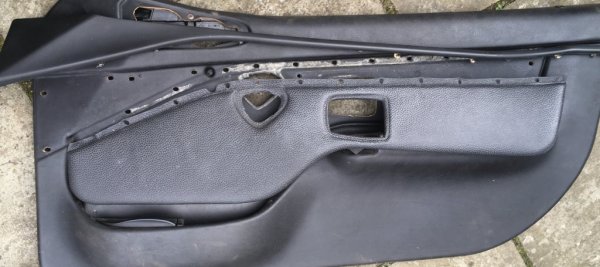
At this point I have to confess that my wife thinks there’s something seriously wrong with me. My cars generally consist of:
Is everything attached?
Is it sort of the correct colour?
Sorted!
Yet here I am actually trying to make things not only match but look ‘nice’. Freakin’ wierd.
These speaker covers are a mess, ordered some stainless mesh, try saying that again. Quickly. If it doesn’t look right I’ll micro blast the originals and repaint. Space on the back for speakers I don’t have, I’ll see what I can find to go in there, and I’ll need to see if those tweeters actually work.
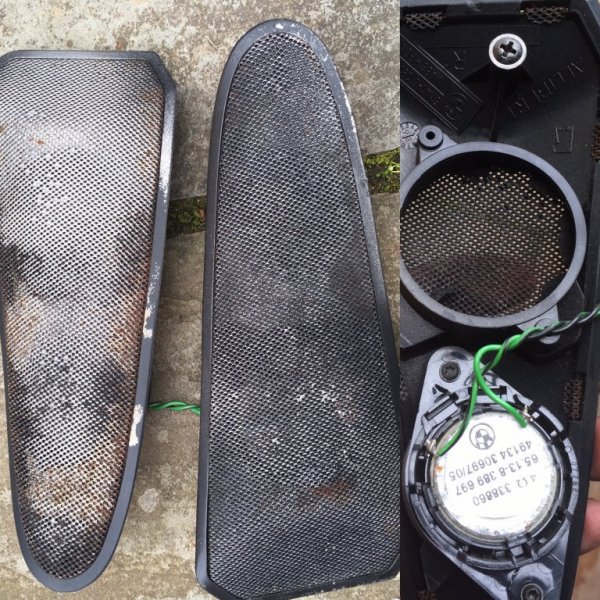
Wonder if I can move the heater controls down? That would allow a double din stereo to fit.
This is set aside to go to recycling, I’ll find a newer one I wouldn’t be scared to fit.

The tool tray thing came out easier than expected,
 to leave what is quite a lot more space,

Now I need to make pattern, actually two patterns, one for a battery cover and one for the floor. All the tools will go into rolls, far easier to store/access, and, you can lie on them if you have to.
I had to try a wheel/tyre, it’s a 225, I reckon the original cars 205 section tyre would just fit.

Strange that it’s set up for 3 sizes of battery.
Cleaned up and coated with Jenolite rust converter, I’ll overcoat with silver Smoothrite.

I’d bought oneof the little chrome lifter for the boot lock and went to fit it whilst I had the Jenolite out. Could I find my big step drill though? Nope. Job for another day.

The drivers door card was loose at the top, decided to remove both as I wanted to sort out the speaker covers, been painted silver, badly, with overspray everywhere. With my garage now jam packed with all the extra stuff from my father in law’s place, I couldn’t find my panel tool so had the quickly make one.
Top tip, if you have to use insulating tape, cut it, don’t tear it. Tear it and it stretches, then it doesn’t stick, unravels, makes a mess of your hands etc.
2nd Top tip, BMW use biscuit (really, that’s what it’s called), rather than the formed plastic, or hardboard, used by some other companies for door cards. If you lever with a screwdriver rather than something which fits both sides of the plastic stud it can break up.

I wanted to spray the leather to match the seats, almost just masked it, but noooo, I just had to be a smart arse and remove the leather panel. Muppet. It’s not on with screws, the plastic studs are melted on the reverse. A countersink bit made short work of it, that was when I realised the edge of the leather tucked under the trim piece above, that had to come off too. Should have just masked it.

At this point I have to confess that my wife thinks there’s something seriously wrong with me. My cars generally consist of:
Is everything attached?
Is it sort of the correct colour?
Sorted!
Yet here I am actually trying to make things not only match but look ‘nice’. Freakin’ wierd.
These speaker covers are a mess, ordered some stainless mesh, try saying that again. Quickly. If it doesn’t look right I’ll micro blast the originals and repaint. Space on the back for speakers I don’t have, I’ll see what I can find to go in there, and I’ll need to see if those tweeters actually work.

Wonder if I can move the heater controls down? That would allow a double din stereo to fit.
Picked the wrong weekend to drop the rear out, weather forecasty app says 90% chance of rain Sat and Mon, 100% on Sunday. Lovely.
I can work a ratchet in the rain, but fibreglass is a bit more tricky, so attacked the boot floor mat whilst it was dry. Once I’d fought my way into the garage. With the amount of stuff that’s come up from Airdrie I can barely make it in the door.
A serious parts cull/eBay/skip sort is required.
And this stuff arrived:

5 oil filters from those helpful folks @ rockauto.com
Look at those prices, just look at them! The carriage was twice the cost of the filters, but still came in at £3:60 a filter And I got them quicker than from Europe with noCustoms hassle.
Then these:
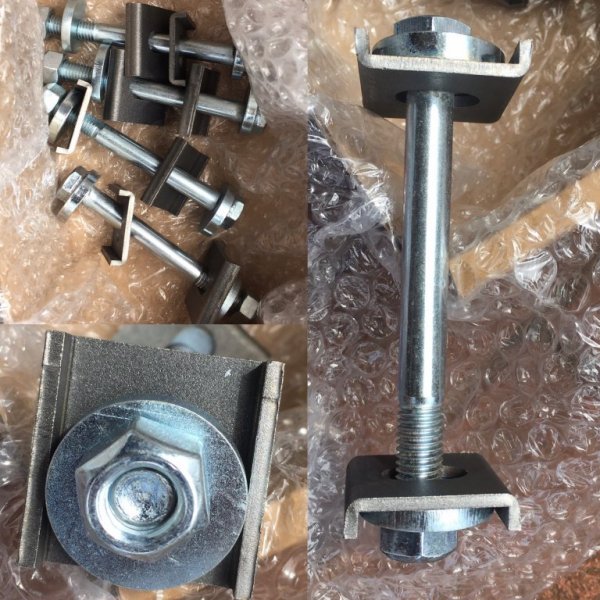
Once welded to the subframe, these allow the camber and toe to be altered. I can lower and play with the suspension to my hearts content. There’s another version with serrated plates, those should be more secure in the event of smacking kerbs, sliding sideways etc. Should also be a helluva lot more awkward to adjust on my own, so the cam bolts will do the job. If necessary I can drill and roll pin it to secure the toe.
Grinding and welding the the rain, love it, I can see a tarpaulin hooked to my garage and bungee’d to the front of the Z in my future.
In the meantime I tack ragged the boot floor, installed the battery and stuck 2 layers of foam board on as a spacer. Filled in the voids with more foam board, hot glued reinforcements, then covered the whole floor in polythene tape. Resin doesn’t stick to poly tape, but I took the precaution of giving it a couple of coats of Easy Lease release agent to ease my paranoia.
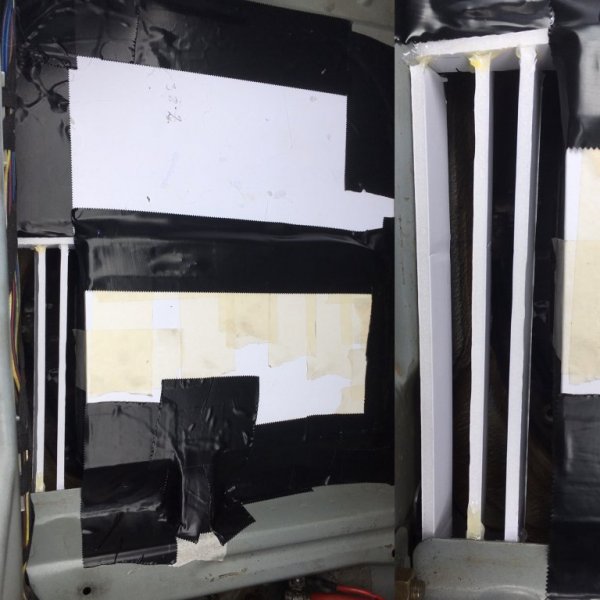

Eww, and after that my pics have gone blurry, so anyway, laid down a couple layers of woven cloth, layer of core fabric and a few more layers of cloth. I have over 50m of woven glass cloth and it’s much easier to work with than CSM (chop strand mat).
Tomorrow I should see how well it’s worked.
I can work a ratchet in the rain, but fibreglass is a bit more tricky, so attacked the boot floor mat whilst it was dry. Once I’d fought my way into the garage. With the amount of stuff that’s come up from Airdrie I can barely make it in the door.
A serious parts cull/eBay/skip sort is required.
And this stuff arrived:

5 oil filters from those helpful folks @ rockauto.com
Look at those prices, just look at them! The carriage was twice the cost of the filters, but still came in at £3:60 a filter
Then these:

Once welded to the subframe, these allow the camber and toe to be altered. I can lower and play with the suspension to my hearts content. There’s another version with serrated plates, those should be more secure in the event of smacking kerbs, sliding sideways etc. Should also be a helluva lot more awkward to adjust on my own, so the cam bolts will do the job. If necessary I can drill and roll pin it to secure the toe.
Grinding and welding the the rain, love it, I can see a tarpaulin hooked to my garage and bungee’d to the front of the Z in my future.
In the meantime I tack ragged the boot floor, installed the battery and stuck 2 layers of foam board on as a spacer. Filled in the voids with more foam board, hot glued reinforcements, then covered the whole floor in polythene tape. Resin doesn’t stick to poly tape, but I took the precaution of giving it a couple of coats of Easy Lease release agent to ease my paranoia.


Eww, and after that my pics have gone blurry, so anyway, laid down a couple layers of woven cloth, layer of core fabric and a few more layers of cloth. I have over 50m of woven glass cloth and it’s much easier to work with than CSM (chop strand mat).
Tomorrow I should see how well it’s worked.
Hi IainMy poor HoS Clio has taken a battering this week
View attachment 180195
Picked up a Style 5 in 8Jx16” to try, but looks like I’m out of luck. That’s only a 235 but it already looks a bit Carlos Fandago (ask your parents, or Youtube), never mind with the 245’s.
View attachment 180197
Even here, my wheel stack is getting out of hand.
View attachment 180201
Trip to Scott at Retro Bimmer in Kilbirnie
View attachment 180199
Ostensibly just to pick up this gearbox for a measly £75. Not something I’ll fit right away, I need to sort a light flywheel and a 22 spline disc, never mind another prop to shorten, but, 75 pictures of the Queen? Not passing that up.
View attachment 180203
Not quite such a cheap trip, as I asked about some coupe seats he had with a bit of wear. “Oh, I have some better ones too”. Indeed they were, almost unmarked, nothing some saddle soap won’t sort. Manual, yay! Height and recline, adjustable for angle and reach. Right then Scott, where’s the nearest cash line? “You want them today? You’ll never get them in there?” I’d had to rearrange all the stuff in the Clio to get the gearbox in. “I’m good at Tetris, I’ll get them in”.
And I did, after a couple of trials. Couldn’t get it out once it had settled on the drive to Airdrie, that too a little manhandling.
They look fantastic and are very comfy, better lumbar support, sitting in one right now waiting on someone delivering something. I just know know they’ll turn up as soon as I crawl under the car.
Shame though, they don’t fit!
View attachment 180205
The seat back is too wide at the top, the back release hits the pillar. I can’t go any further in, the belt mount and actuator are hard up against the tunnel, and that’s before the carpet goes back in. They’re too high as well, even in the lowest setting.
My stuff arrived.
Great write up and good to know there are other people still left in this world of chuck and re-buy who can make and fix stuff (must be a Scottish thing, I'm from Partick).
Which 6-speed box fits? Same for M52TUB28?
Up to see family in Culross late July, are there any Z meets on?
Ahh, small world, my lad rents a flat in Kildonan Drive.
I’ve always had cars that weren’t popular, I wanted anything, I had to make it. I suppose a bit of it comes from my job, I’m a dental technician to trade, everything I make is bespoke.
Quite strange with this car, normally I don’t bother, but since I don’t have any pressure to get it MOT’d asap any longer, I’m doing cosmetic things. Wierd.
Not sure what’s happening up here, only that there are no spectators at Motorsport events. Though the Nictator seems to allow football events, whether that’s just so she has people to rant about,
When you’re up here, I’ll be down in Hemel, hopefully picking up parts whilst I’m down.
Abandoned plans to drop the back end this weekend. Good call, the weather would have meant little done and I’m under strict instructions not to have it on stands for weeks.
Made a mistake with my boot floor mat. I should have put a 5mm spacer at the front and rear. The rear wall narrows as it rises, so the damn thing wouldn’t come out, I had to bend it slightly, which damaged a corner. Easy fix.
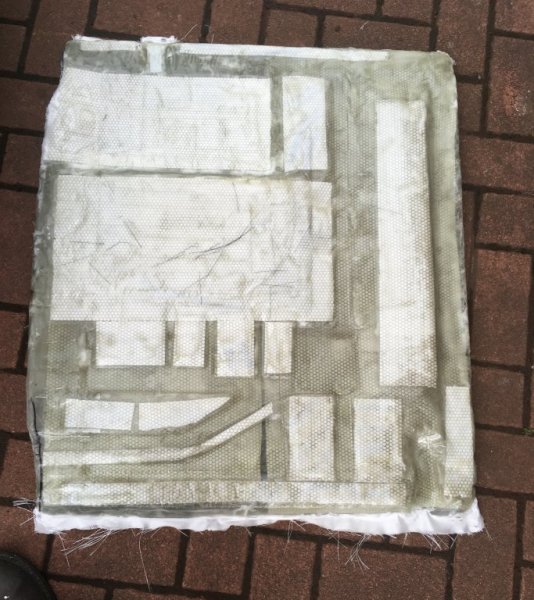
Trimmed the edges, wear gloves at all times, both sharp, and an irritant. If you’re daft enough not to use a good quality mask, you’ll only do it once as you will be coughing up razor blades for a week.
Marked (badly as it turned out), where the the battery box is a cut that panel out.
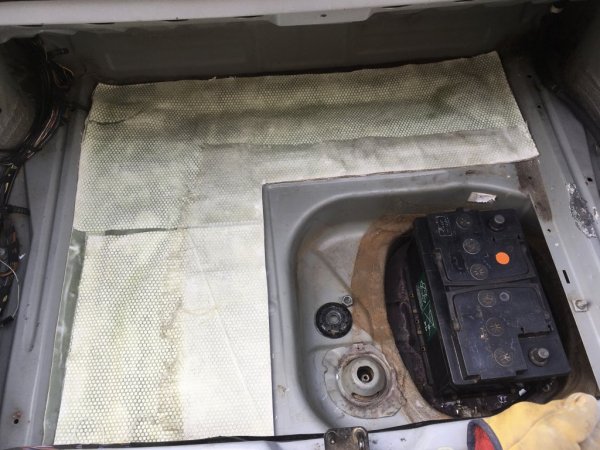
With the battery cover on.

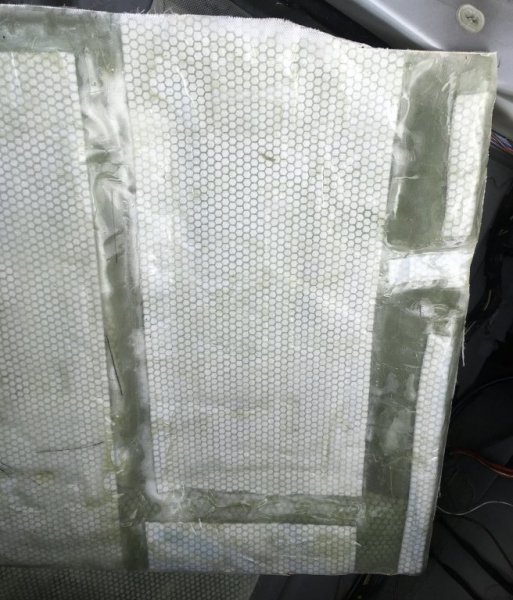
I’ll trim and round the edges, then cover in some sort of carpet. Somewhere I have a roll of soft rubber for the base.
Not sure if you can see the moulding on the bottom of the battery box. Looks flimsy, but you could probably stand on it. There will be a 3mm thick layer of rubber on the underside.
The stainless mesh I ordered for the speaker covers arrived, but won’t do the job, so I folded back the tabs and carefully pressed out the old mesh.

Very, very easy to distort, I ended up using plastic wedges to lever it out.
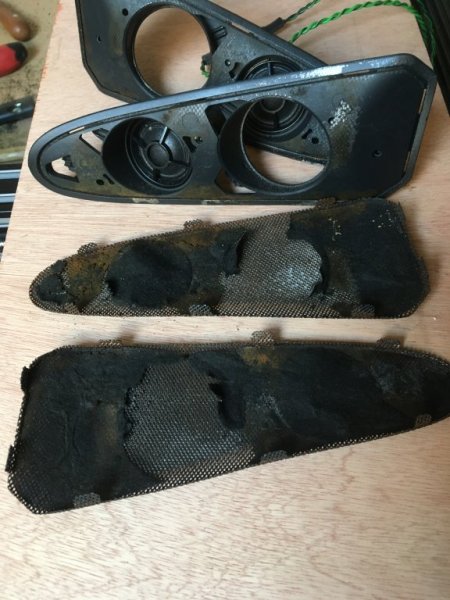
I’m not even sure what the black papery stuff is, it’s thinner than any acoustic cloth I’ve seen. It’s completely disintegrated anyway. I’ll microblast them with alumina and spray satin black.
Ebay supplied another rear anti roll bar, I have two different ideas in my head to make a rear bar adjustable. Not sure which method I’ll go with yet.

Waiting on weld on spring platforms to arrive for the front struts, decided to convert them to adjustable coil overs. Actually wondering if it’s possible to go that route at the rear, I know some of the Compact Cup cars use them, though expensive custom items.
I’ve always had cars that weren’t popular, I wanted anything, I had to make it. I suppose a bit of it comes from my job, I’m a dental technician to trade, everything I make is bespoke.
Quite strange with this car, normally I don’t bother, but since I don’t have any pressure to get it MOT’d asap any longer, I’m doing cosmetic things. Wierd.
Not sure what’s happening up here, only that there are no spectators at Motorsport events. Though the Nictator seems to allow football events, whether that’s just so she has people to rant about,
When you’re up here, I’ll be down in Hemel, hopefully picking up parts whilst I’m down.
Abandoned plans to drop the back end this weekend. Good call, the weather would have meant little done and I’m under strict instructions not to have it on stands for weeks.
Made a mistake with my boot floor mat. I should have put a 5mm spacer at the front and rear. The rear wall narrows as it rises, so the damn thing wouldn’t come out, I had to bend it slightly, which damaged a corner. Easy fix.

Trimmed the edges, wear gloves at all times, both sharp, and an irritant. If you’re daft enough not to use a good quality mask, you’ll only do it once as you will be coughing up razor blades for a week.
Marked (badly as it turned out), where the the battery box is a cut that panel out.

With the battery cover on.

I’ll trim and round the edges, then cover in some sort of carpet. Somewhere I have a roll of soft rubber for the base.
Not sure if you can see the moulding on the bottom of the battery box. Looks flimsy, but you could probably stand on it. There will be a 3mm thick layer of rubber on the underside.

The stainless mesh I ordered for the speaker covers arrived, but won’t do the job, so I folded back the tabs and carefully pressed out the old mesh.

Very, very easy to distort, I ended up using plastic wedges to lever it out.

I’m not even sure what the black papery stuff is, it’s thinner than any acoustic cloth I’ve seen. It’s completely disintegrated anyway. I’ll microblast them with alumina and spray satin black.
Ebay supplied another rear anti roll bar, I have two different ideas in my head to make a rear bar adjustable. Not sure which method I’ll go with yet.

Waiting on weld on spring platforms to arrive for the front struts, decided to convert them to adjustable coil overs. Actually wondering if it’s possible to go that route at the rear, I know some of the Compact Cup cars use them, though expensive custom items.
Sorry, I missed the bit about the box. The one I picked up is a 6 speed from a 1.8 3 series, I have no idea if it’s a Getrag or ZF. At £75 I really didn’t care. Can’t get at it the moment, too much stuff piled in front of it. When I drop the rear I’ll hopefully get time to drop the 5 speed as well, see what I need to do.
I can’t believe I haven’t updated this since July, been completely mental. Whilst some projects are one step forward, two back, this has been more like a train ride back.
Discovered the boot half full of water, which freaked me out, just a tad. Stupidly torrential rain at the time, weirdly the water was all under my new boot mat. Hasn’t happened since, I can only assume I compromised the boot seal with the hood cover. Muppet.
Swimbo demanded no cars in the drive on axle stands for weeks, so I bought a rear beam, then a rear trailing arm for a bargain £70.


Done very little to them, with Motorsport restarting Marshals were in high demand, except some folks had moved on to other things and others had chucked it. Very few free weekends. Borrowed my son’s Jag, much easier to set out the equipment

Picked up these not realising their just maxspeeding things, they’lldo for now.
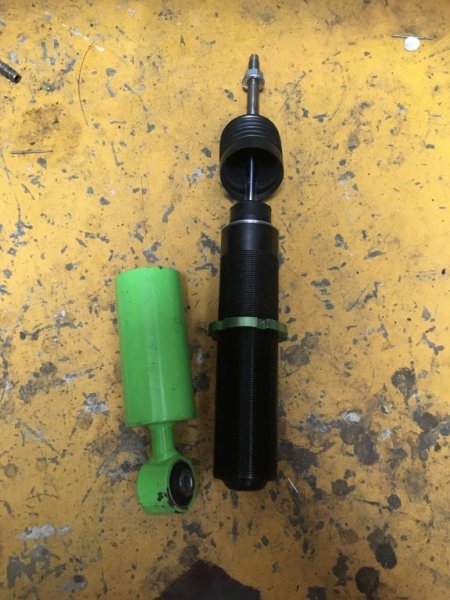
The sleeves for the front coil overs arrived and I’d ordered the wrong ones so had to go back, like these
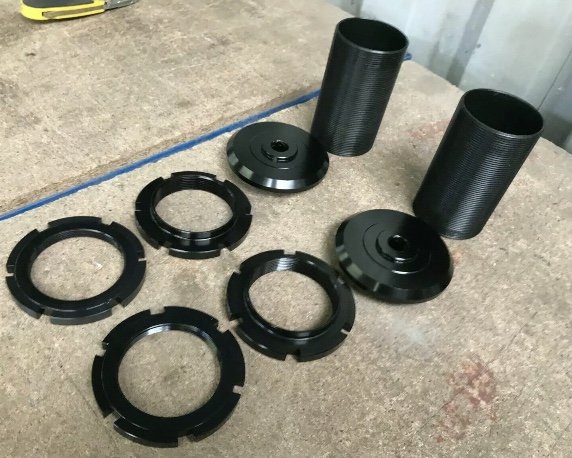
Been trying to decide whether to continue that route, or just get new tubes

Tubes obviously need brackets, that’s not hard. The old struts need a brake bracket remade, another repaired, new seals, the de bushes seem fine, then finished and painted. New tubes are only £25 more expensive. And writing that out, it seems obvious now that new tubes are the way to go.
When I built my blast cabinet I wanted to do wheels easily, takes the arm with ease.
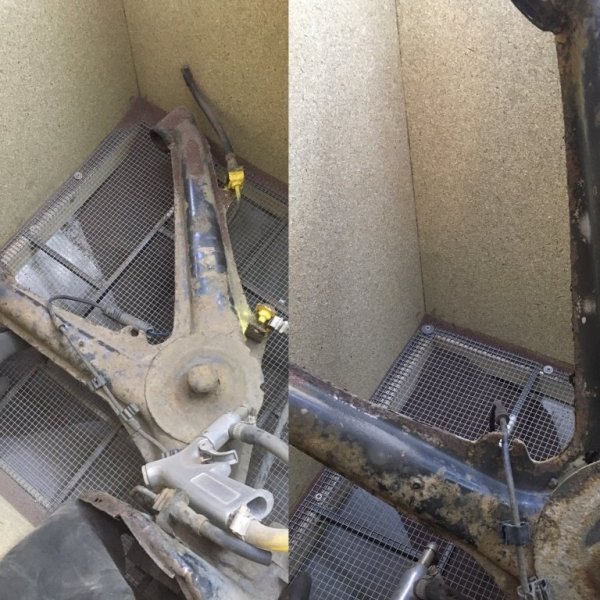
Im impressed with how well the paint has lasted.
Discovered the boot half full of water, which freaked me out, just a tad. Stupidly torrential rain at the time, weirdly the water was all under my new boot mat. Hasn’t happened since, I can only assume I compromised the boot seal with the hood cover. Muppet.
Swimbo demanded no cars in the drive on axle stands for weeks, so I bought a rear beam, then a rear trailing arm for a bargain £70.


Done very little to them, with Motorsport restarting Marshals were in high demand, except some folks had moved on to other things and others had chucked it. Very few free weekends. Borrowed my son’s Jag, much easier to set out the equipment

Picked up these not realising their just maxspeeding things, they’lldo for now.

The sleeves for the front coil overs arrived and I’d ordered the wrong ones so had to go back, like these

Been trying to decide whether to continue that route, or just get new tubes

Tubes obviously need brackets, that’s not hard. The old struts need a brake bracket remade, another repaired, new seals, the de bushes seem fine, then finished and painted. New tubes are only £25 more expensive. And writing that out, it seems obvious now that new tubes are the way to go.
When I built my blast cabinet I wanted to do wheels easily, takes the arm with ease.

Im impressed with how well the paint has lasted.
Helped one of the guys at work buy a Smart early in the year, we spent a few days servicing it. Interesting little thing, but the air box, jeez, what a nightmare. Took half an hour to fit the top back on! Only goes one way, can’t see the clips, can’t feel them and the pipe work is all rigid plastic. Repairing the exhaust was easy though, just remove the whole rear panel!
View: https://youtu.be/2H7RPKLwv1E
Bought a splitter, not realising post facelift bumpers must be a different profile, goes nowhere near it. Oops!
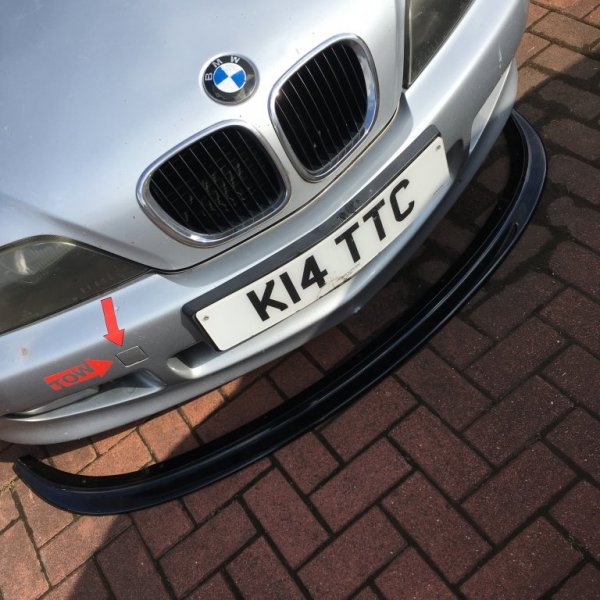
So spent ages with Trnio trying to make an STL file of the one corner splitter I have, without success

It’s too smooth, not enough surface detail, I get lots of artifices I can’t get rid of. So, yet another project, make plugs for a pair of corner splitters from mdf.
In amongst all that managed a few days at my son’s, planning a trip to spursfaninacoupe and picking up wheels, except none of that happened, I did get a pair of Loakes out of it though, so I shouldn’t complain.
Scared myself a bit, that’s my youngest lad. He’s an inch taller than me, but that’s a track day helmet, smaller than my Simpson. Probably evens out. Those sissy bars are too low, so they’ll have to go on my ever growing Sale list.
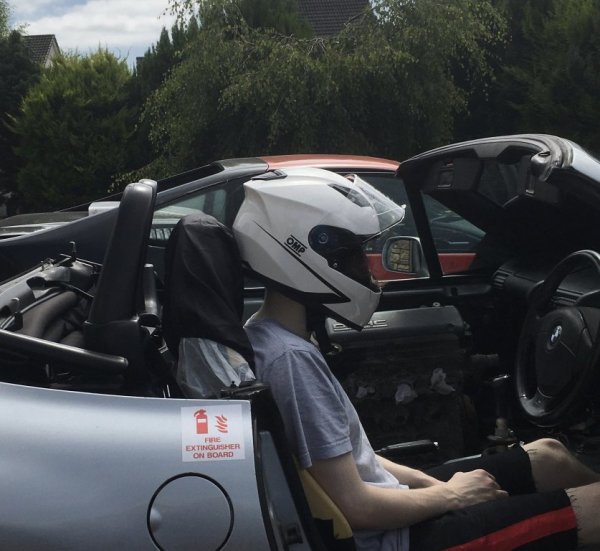
Yes, I’ll say it before someone chimes in. Cars are difficult to roll over. Except I’ve almost managed it. Twice. I need some advice from a Scrutineer, but the plan is a properly braced bar, so the tonneau cover needs to go too.
Removed the bushes from the beam and started on the adjusters. Contrary to popular belief you can adjust the standard holes if you can weld. No, it’s not using an Imperial bolt, that way is madness, old back in the day method of selling a car with bent suspension. I know first hand having to help fix such a car a friend bought.
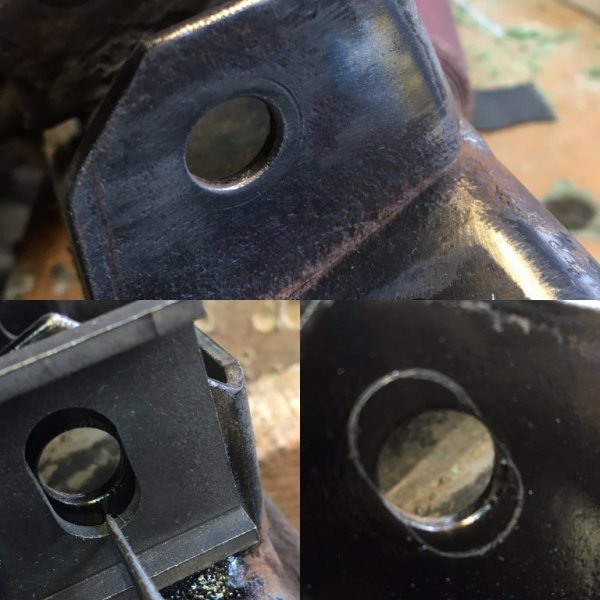
Normally you want to weld the tab on before cutting the excess out with a tungsten cutter. That’s how you adjust “non adjustable” suspension. I’ve made a little cobalt chrome fixture though, so no chance of nicking or marking the tab.
Once I fit this to the car I can do my own for someone who can’t weld.
The later trailing arms have a brace, started on making my own. Card and masking tape. Don’t bother trying to be super accurate in one go. Use small bits and simple tape them together. Transferred to 2mm steel sheet.

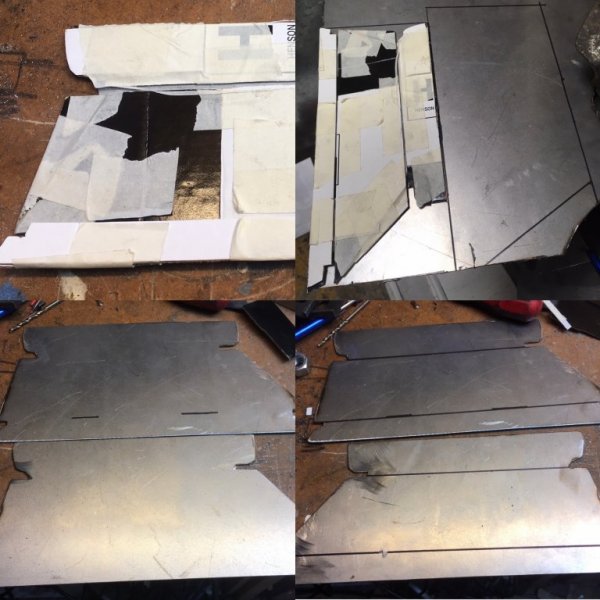
Only needs one pattern, you just have to remember to flip the pattern before it’s bent.
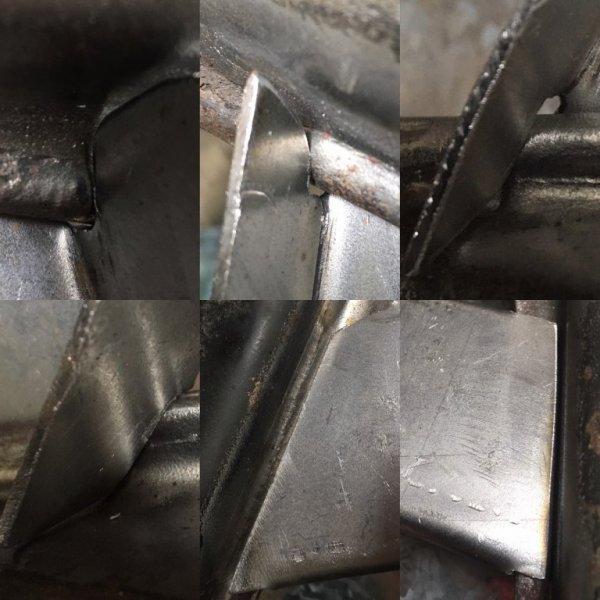
Fits nice and tight. Once it’s finished you can make a paper pattern to save time on the other one. Then keep it for future use.
If I’m going to go custom, feck it, I’m going to go CUSTOM. No one will ever see it, except the Mot guy. Hopefully. I know it’s there though and it’s my car.

Bought a splitter, not realising post facelift bumpers must be a different profile, goes nowhere near it. Oops!

So spent ages with Trnio trying to make an STL file of the one corner splitter I have, without success

It’s too smooth, not enough surface detail, I get lots of artifices I can’t get rid of. So, yet another project, make plugs for a pair of corner splitters from mdf.
In amongst all that managed a few days at my son’s, planning a trip to spursfaninacoupe and picking up wheels, except none of that happened, I did get a pair of Loakes out of it though, so I shouldn’t complain.
Scared myself a bit, that’s my youngest lad. He’s an inch taller than me, but that’s a track day helmet, smaller than my Simpson. Probably evens out. Those sissy bars are too low, so they’ll have to go on my ever growing Sale list.

Yes, I’ll say it before someone chimes in. Cars are difficult to roll over. Except I’ve almost managed it. Twice. I need some advice from a Scrutineer, but the plan is a properly braced bar, so the tonneau cover needs to go too.
Removed the bushes from the beam and started on the adjusters. Contrary to popular belief you can adjust the standard holes if you can weld. No, it’s not using an Imperial bolt, that way is madness, old back in the day method of selling a car with bent suspension. I know first hand having to help fix such a car a friend bought.

Normally you want to weld the tab on before cutting the excess out with a tungsten cutter. That’s how you adjust “non adjustable” suspension. I’ve made a little cobalt chrome fixture though, so no chance of nicking or marking the tab.
Once I fit this to the car I can do my own for someone who can’t weld.
The later trailing arms have a brace, started on making my own. Card and masking tape. Don’t bother trying to be super accurate in one go. Use small bits and simple tape them together. Transferred to 2mm steel sheet.


Only needs one pattern, you just have to remember to flip the pattern before it’s bent.

Fits nice and tight. Once it’s finished you can make a paper pattern to save time on the other one. Then keep it for future use.
If I’m going to go custom, feck it, I’m going to go CUSTOM. No one will ever see it, except the Mot guy. Hopefully. I know it’s there though and it’s my car.


I’d recovered the rear bits where the bars mount, then the console, in vinyl. Discussing with a friend, “ hope you didn’t use Screwfix, their adhesive is no longer high temp”.
Indeed I had.
Stuck the console in the shed window, full view of the sun. This happened.

All peeled off. Lesson learned.
More bits arrived, hose from Rockauto, rear discs from eBay.


Even with carriage the hose and oil seal were half UK price. Thankfully, no oversize pistons in stock.
I desperately need to have a parts cull, and a reorganisation, I can barely get in the garage.
Started my hardtop project. If I rush I should have a buck before the end of November. Will leave it like that until next year.
Acquire a frame

Cut off the rear and tension it, weld all the pivots.
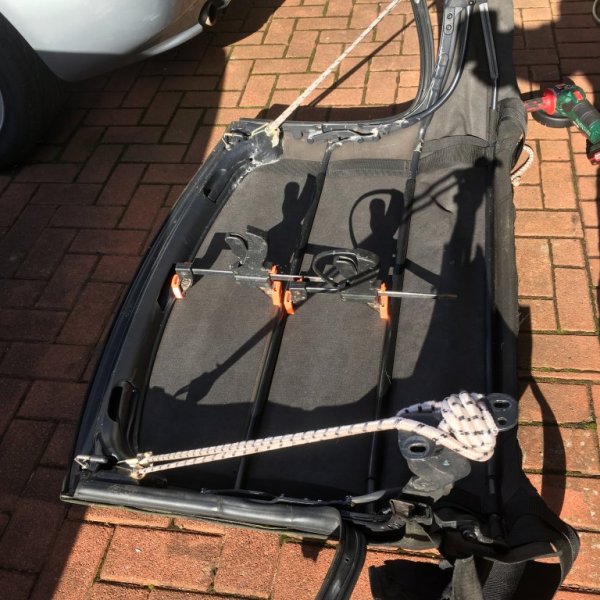

Remove brackets and tubes getting in the way.

Lift onto the car
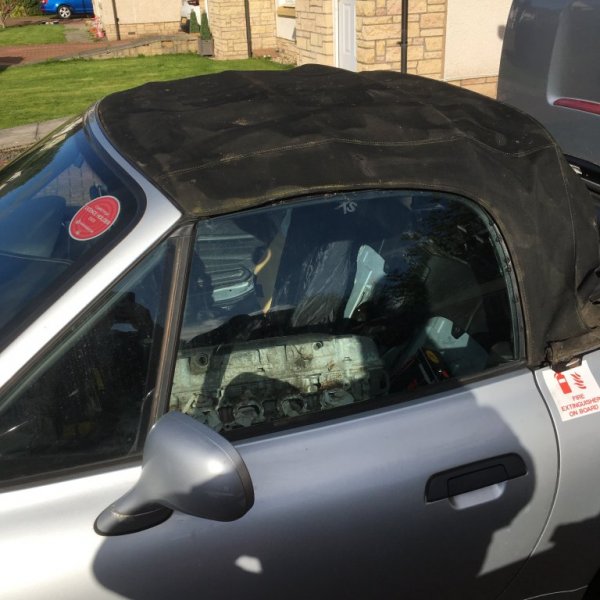

At this point think, “ooh, 2 piece Targa”, then think, “ shut up unconscious mind, you’re a p*****”.
I did think to open the boot and check how much clearance there is to play with.
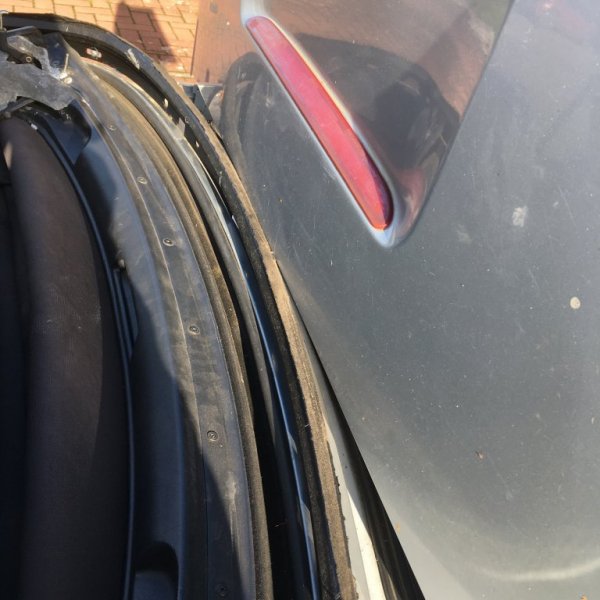
Just as well, I had planned on using the metal spreader/seal. That’s not now happening. I’ll need to make a template, then, I think, a hardboard base ( because of the shiny side).
Metal rods, or strips, as guides.
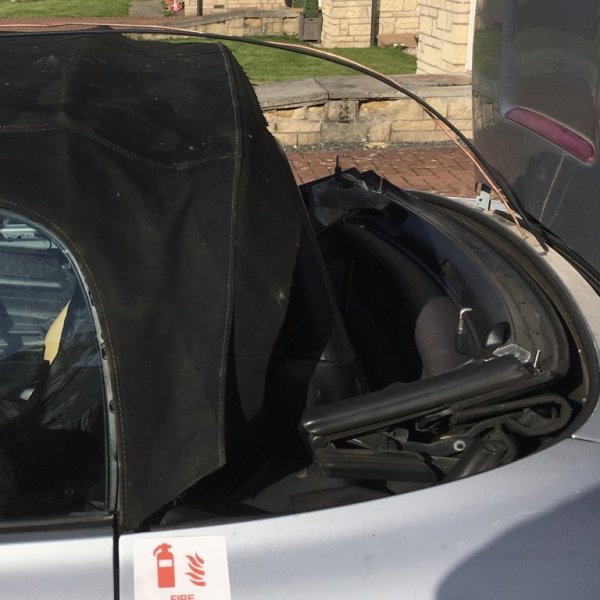
Then chicken wire skinned in fibreglass. And filler, and lots and lots of sanding. It can sit like that until I make a mould. I only need it November to February. I don’t need a rear window, I leave and return in the dark, a rear camera will be fine. A plastic window would be light, but then I’d legally have to clean it. Scraping ice off at -10C ? Wouldn’t last a week.
I want the whole thing light enough I can quickly remove it on my own for the days I need/want to use the car. Yes, hood down. In winter. That’s what heated seats are for.
Under 25kg is the aim.
Indeed I had.
Stuck the console in the shed window, full view of the sun. This happened.

All peeled off. Lesson learned.
More bits arrived, hose from Rockauto, rear discs from eBay.


Even with carriage the hose and oil seal were half UK price. Thankfully, no oversize pistons in stock.
I desperately need to have a parts cull, and a reorganisation, I can barely get in the garage.
Started my hardtop project. If I rush I should have a buck before the end of November. Will leave it like that until next year.
Acquire a frame


Cut off the rear and tension it, weld all the pivots.


Remove brackets and tubes getting in the way.

Lift onto the car


At this point think, “ooh, 2 piece Targa”, then think, “ shut up unconscious mind, you’re a p*****”.
I did think to open the boot and check how much clearance there is to play with.

Just as well, I had planned on using the metal spreader/seal. That’s not now happening. I’ll need to make a template, then, I think, a hardboard base ( because of the shiny side).
Metal rods, or strips, as guides.

Then chicken wire skinned in fibreglass. And filler, and lots and lots of sanding. It can sit like that until I make a mould. I only need it November to February. I don’t need a rear window, I leave and return in the dark, a rear camera will be fine. A plastic window would be light, but then I’d legally have to clean it. Scraping ice off at -10C ? Wouldn’t last a week.
I want the whole thing light enough I can quickly remove it on my own for the days I need/want to use the car. Yes, hood down. In winter. That’s what heated seats are for.
Under 25kg is the aim.
My hardtop mould has to wait until next year. Every day I’ve been off it’s either raining or below freezing. Just been accumulating parts and working indoors.
Getting all the family cars through Mot’s took up several weekends, then rearranging the garage, the boiler kept playing up, eventually needed replacement.
Got a set of wide body wings from Andy, @spurs fan in a coupe, then a pair of sills from Asad, gone in my loft. Won’t be fitted this winter, lost too much time to the boiler shenanigans.
Rear beam is all cut out and ready to weld when I get space on the bench to weld it.
Acquired a staggered set of 68’s. Require powder coating. I’m not sure whether to fit them to the Z, or use them as winter wheels on my wife’s coupe, putting the BBS RC’s on the Z.

Spent a while stripping some wishbone bushes out for my son to fit poly and me to press in M3 bushes. It’s strange that brackets with bushes fitted are cheaper than bare brackets.
Anyway, I have a home made hydraulic press which made an easy job of it.
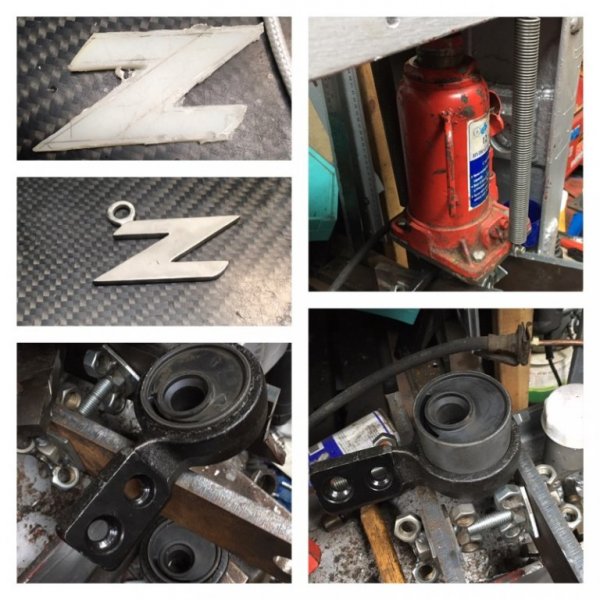
The Z is a cobalt key ring I made at work. I like to have Custom key rings for my cars. As you do. Didn’t turn out as well as hoped, not enough sprues I think, so have a contraction crack in the middle. The 3 is in the finish, bead blasting, brushed outer rim and polished edge. I may heat treat to to give a black outer rim.
Though I liked the utter hideousness (if that’s a word), of the Chinese spoiler, I found two corners for the original BMW/Zender spoiler. Planned on making the Center from scratch. Of course then the full lot turned up, so now I have lots of options.
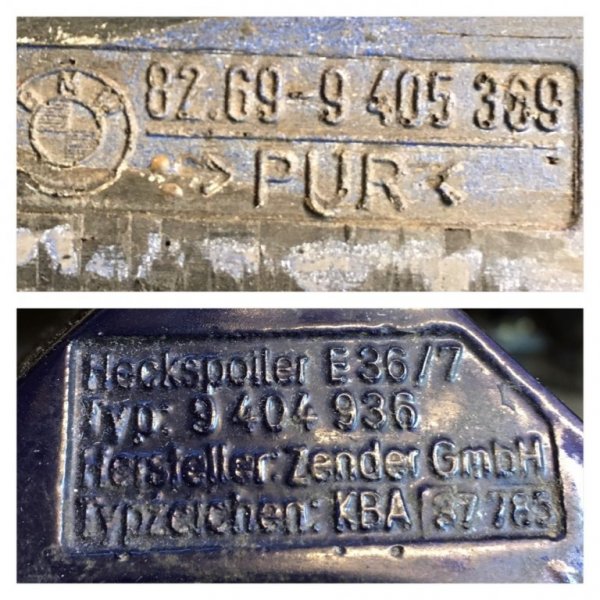
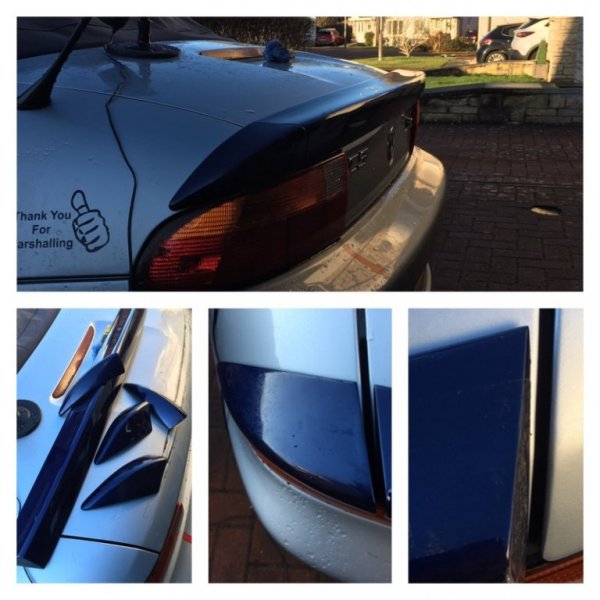
Not actually the greatest fit, I can’t decide whether to just fit it, or adjust it to fit my car and make a mould. The fact I could finish it in carbon and not have to paint it, is probably swaying it in that direction.
Getting all the family cars through Mot’s took up several weekends, then rearranging the garage, the boiler kept playing up, eventually needed replacement.
Got a set of wide body wings from Andy, @spurs fan in a coupe, then a pair of sills from Asad, gone in my loft. Won’t be fitted this winter, lost too much time to the boiler shenanigans.
Rear beam is all cut out and ready to weld when I get space on the bench to weld it.
Acquired a staggered set of 68’s. Require powder coating. I’m not sure whether to fit them to the Z, or use them as winter wheels on my wife’s coupe, putting the BBS RC’s on the Z.

Spent a while stripping some wishbone bushes out for my son to fit poly and me to press in M3 bushes. It’s strange that brackets with bushes fitted are cheaper than bare brackets.
Anyway, I have a home made hydraulic press which made an easy job of it.

The Z is a cobalt key ring I made at work. I like to have Custom key rings for my cars. As you do. Didn’t turn out as well as hoped, not enough sprues I think, so have a contraction crack in the middle. The 3 is in the finish, bead blasting, brushed outer rim and polished edge. I may heat treat to to give a black outer rim.
Though I liked the utter hideousness (if that’s a word), of the Chinese spoiler, I found two corners for the original BMW/Zender spoiler. Planned on making the Center from scratch. Of course then the full lot turned up, so now I have lots of options.


Not actually the greatest fit, I can’t decide whether to just fit it, or adjust it to fit my car and make a mould. The fact I could finish it in carbon and not have to paint it, is probably swaying it in that direction.
Probably time to update this, not really been a great deal of progress, just far, far too much going on. Have a huge push on now though, as my lad is returning from Hemel in October to work from home. Swimbo has declared scrap it, sell it, or mot it. Going for the latter, though there’s not a chance in hell of having it done by then.
So much stuff and tools came up from my in laws I ended up completely rearranging my spanner wall. It was Lidl/Aldi plastic panels, it’s now mdf and clips. Highly recommend it.

I used to use two roll cabs and a top chest, totally useless in my tiny garage. Sold them on and now use intermediate chests in IKEA Ivar shelving, the wall, and a small tote, definitely wouldn’t go back.
I was pushing an Mx5 at the start of the year, I’m sure the driver was a bit bemused by a marshal running his nails over the rear window, that’s because I’d realised it was glass. And thin, and roughly the right size. Took a while, but I eventually found one cheap on eBay for £27 delivered.
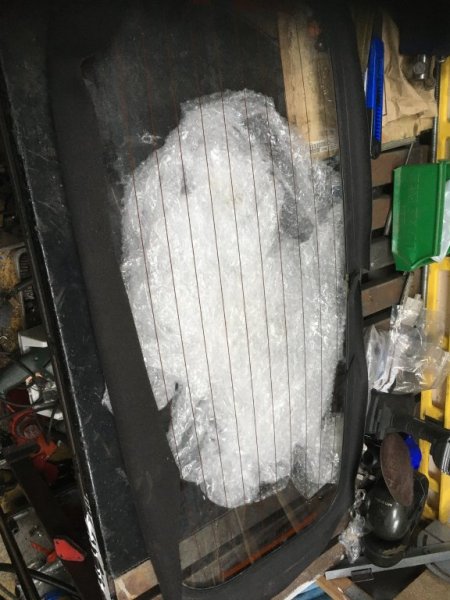
So my hardtop design completely changed, not that I’d made a great deal of progress. Spent ages, days really, making a wire template for the window. I just was never 100% happy with it. Contemplated just glassing it into the buck, but nicking it with a sander might shatter it. Thinking I could just apply some sticky plastic in case that happened, I realised the easy way was to vacuum form a composite panel. That meant I’d have a panel slightly larger to give space for a seal. That was a great success but that pon the back burner for the moment.
The rear beam I built up as someone wanted to buy it, that fell through, so I’ll use it myself and maybe eBay the spare beam next year. I plan on fitting standard bushes and fill them with poly adhesive, stiffer than standard but not as harsh as full poly. Adjustable camber and toe will be a boon.
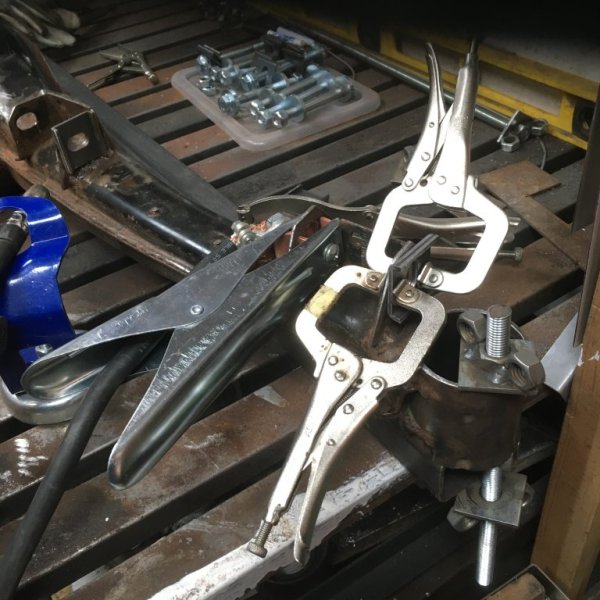
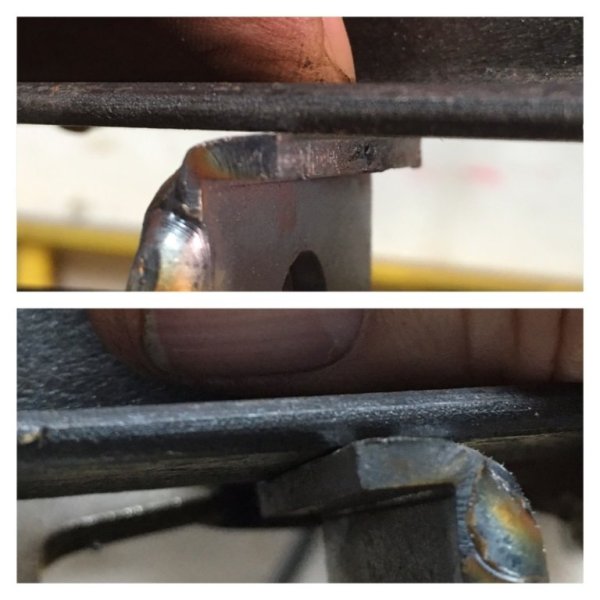
Takes quite a while to set up, but should be well worth it.
Reinforced the trailing arm
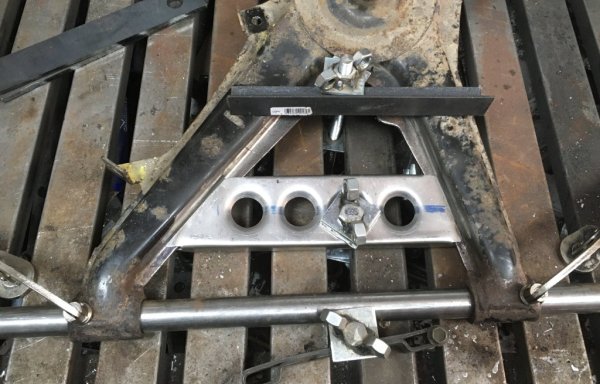
If you’re doing it, the bush diameter is 27mm, that’s not commercially available as bar. I used 25mm with 1mm sheet wrapped round. Zap and chill prevents warping.
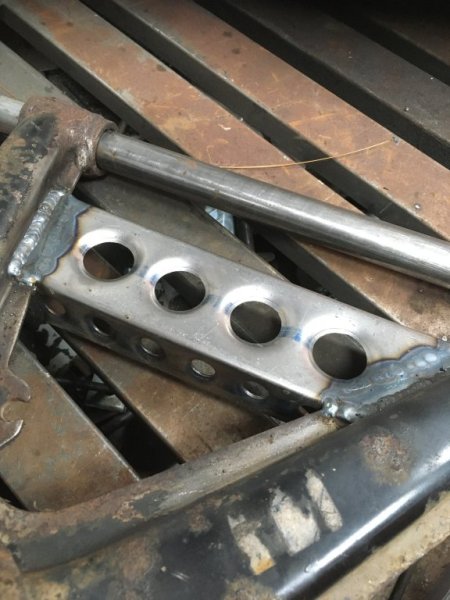
If you think it doesn’t work, I’m touching it 30sec after welding, if it were seam welded I’d be in the burns unit.

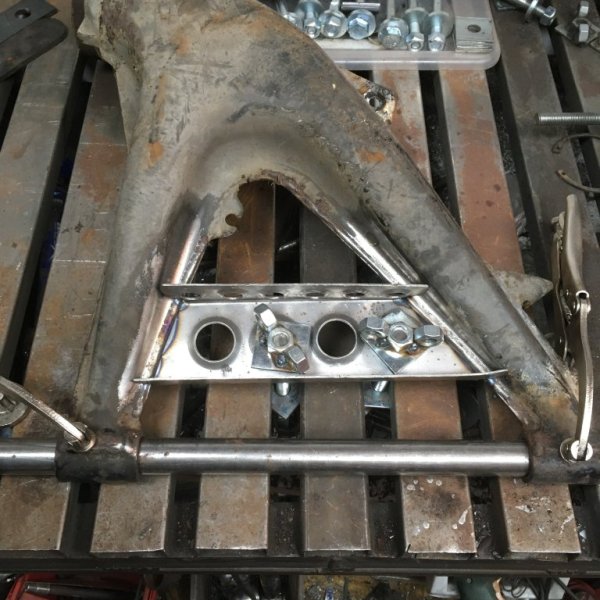
Ok, so I may have gone a bit mad, just a bit, but what the hell.
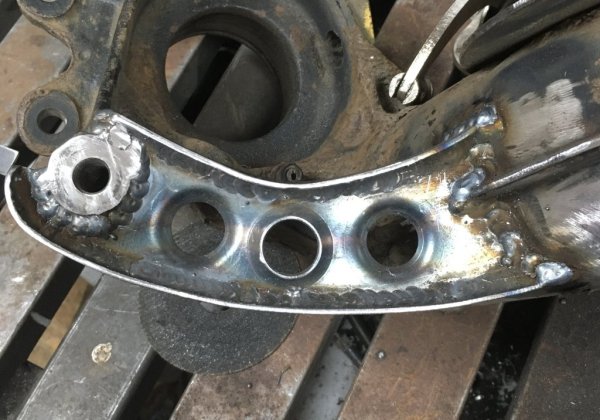
I may go full coil over at the rear. Eventually.
At the front I’m working on the new casings for the Bilsteins, that’s proving to be a time consuming pain in the arse.
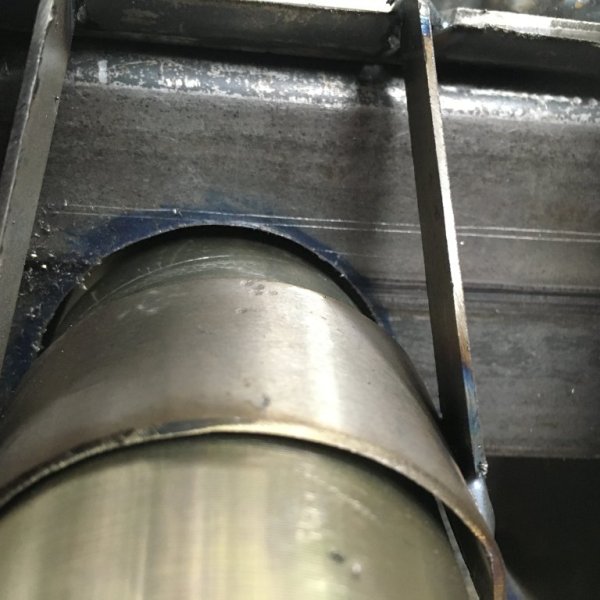
After measuring and measuring, even more measuring, it still doesn’t fit. I’m on version 2, which is now much closer.
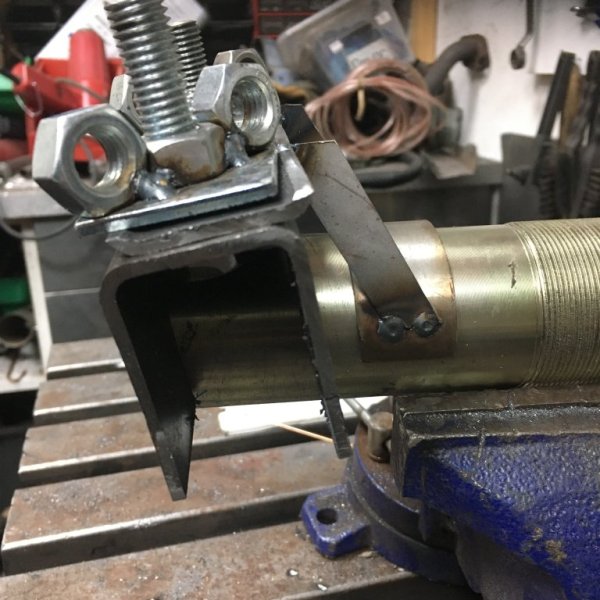
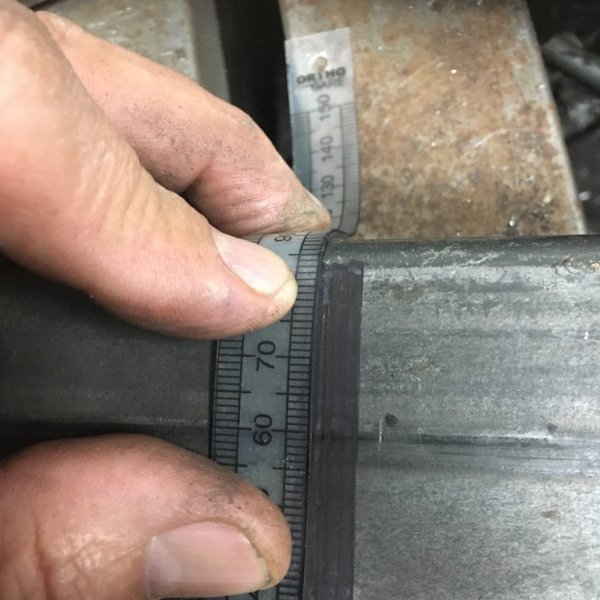
I always see people struggling to transfer lines from one face to the adjacent. Here’s an easy, totally fool proof way, use a plastic flexi ruler.
I’ve been asked several times in the last couple years about welding gear friends should buy. This is my number one, an Optrel Weldcap
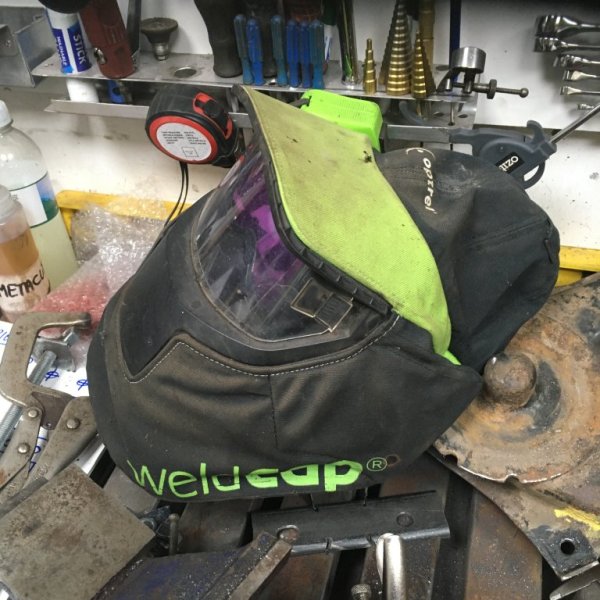
I really can’t recommend this thing highly enough, it’s light, super comfortable, let’s you get into super tight spaces and the vision is superb. They’re about £100 ish, but so, so much better than any of the cheaper helmets, none of which cover your full scalp, or let you into tight spaces.
So much stuff and tools came up from my in laws I ended up completely rearranging my spanner wall. It was Lidl/Aldi plastic panels, it’s now mdf and clips. Highly recommend it.

I used to use two roll cabs and a top chest, totally useless in my tiny garage. Sold them on and now use intermediate chests in IKEA Ivar shelving, the wall, and a small tote, definitely wouldn’t go back.
I was pushing an Mx5 at the start of the year, I’m sure the driver was a bit bemused by a marshal running his nails over the rear window, that’s because I’d realised it was glass. And thin, and roughly the right size. Took a while, but I eventually found one cheap on eBay for £27 delivered.

So my hardtop design completely changed, not that I’d made a great deal of progress. Spent ages, days really, making a wire template for the window. I just was never 100% happy with it. Contemplated just glassing it into the buck, but nicking it with a sander might shatter it. Thinking I could just apply some sticky plastic in case that happened, I realised the easy way was to vacuum form a composite panel. That meant I’d have a panel slightly larger to give space for a seal. That was a great success but that pon the back burner for the moment.
The rear beam I built up as someone wanted to buy it, that fell through, so I’ll use it myself and maybe eBay the spare beam next year. I plan on fitting standard bushes and fill them with poly adhesive, stiffer than standard but not as harsh as full poly. Adjustable camber and toe will be a boon.


Takes quite a while to set up, but should be well worth it.
Reinforced the trailing arm

If you’re doing it, the bush diameter is 27mm, that’s not commercially available as bar. I used 25mm with 1mm sheet wrapped round. Zap and chill prevents warping.

If you think it doesn’t work, I’m touching it 30sec after welding, if it were seam welded I’d be in the burns unit.


Ok, so I may have gone a bit mad, just a bit, but what the hell.

I may go full coil over at the rear. Eventually.
At the front I’m working on the new casings for the Bilsteins, that’s proving to be a time consuming pain in the arse.

After measuring and measuring, even more measuring, it still doesn’t fit. I’m on version 2, which is now much closer.

I always see people struggling to transfer lines from one face to the adjacent. Here’s an easy, totally fool proof way, use a plastic flexi ruler.

I’ve been asked several times in the last couple years about welding gear friends should buy. This is my number one, an Optrel Weldcap

I really can’t recommend this thing highly enough, it’s light, super comfortable, let’s you get into super tight spaces and the vision is superb. They’re about £100 ish, but so, so much better than any of the cheaper helmets, none of which cover your full scalp, or let you into tight spaces.
I’m glad your still at it, not to worry as it’s been taking ages to do mine with other things getting in the way of financing now goodies shopping list nearly completed.
I have bits of Z all over the house, in the shed and so much in the garage there’s a tiny space to shuffle up to the welding bench. That’s after three car loads of bits to recycling.
Likely going back together with no carpets, just so I can mop up any leaks.
It’ll get there though.
Likely going back together with no carpets, just so I can mop up any leaks.
It’ll get there though.
