Time for an overhaul of my 1.9 '98 BMW Z3 Individual

Matt Barnes

Zorg Guru (II)
Supporter
British Zeds
Joined
Jul 18, 2020
Points
123
Location
Portchester, Fareham
Model of Z
1998 BMW Z3 Individual 1.9 M44 B19
Back in the day we trialled tin and gold plating crowns and substructures. I wasn’t involved but I’m pretty sure they had to be dried before final plating. Checked all our archived instructions today but nothing there.
I do remember the voltage was critical to make it work effectively, and the experiments were abandoned because both kits were battery powered. Battery didn’t last. Typical NHS, would have needed a committee to order a power supply.
Even further back I did quite a bit of copper plating. Alumina blasted, or polished and steam cleaned, wiped with acetone.
Flashed for the first couple of minutes at 75%, then 20 mins at 25%. % of what I haven’t a clue, the box was that old the case was made of wood, probably WW2. Looked like something from a Hammer movie, but it played very well.

If you want those pipe brackets in stainless Matt, I’m pretty sure I have a spare pair cut, only need bent in a vice.
thank you Iain...it is quite an art that's for sure!.. as you can guess I'm using this project to learn and practice as many techniques as I can...my big mistake was letting them air dry in the garage, which I've now fixed..so far so good and no overnight flash rust. In a perfect world of course I'd like them all shiny bright yellow zinc, but I'm not paying 250 quid for a proper plating kit. Plus if it all goes horribly wrong I'll just wire wheel them and cover them in some rust treatment or paint them in Hammerite. Mind you I've plated those bolts so many times now, they're probably more zinc than steel ! 😄
 

IainP

Zorg Guru (II)
British Zeds
Joined
Feb 20, 2019
Points
119
Location
Out of my Tree, North of Perth, Scotland
Model of Z
1.9
I was lucky with the copper plating, I spoke to the one guy left in the hosp right before he retired, plated anything and everything until the copper crystals ran out.
I’m sure my boss used the hand drier when gold plating, from what I saw it worked well with a new battery, so I expect it was the same as the copper, get a thin layer on quickly to fully coat the part, then build up slowly to get a smooth coating. If I tried to build up quickly with copper I got a ‘spiky’ surface, pulled the copper out of solution too quickly for any circulation to replenish it. I think. The tank had no method of mixing or circulating the solution.
I was too junior to be allowed near the gold unit, only joined the dept, ‘85/86 maybe. One of the copper pieces I used as a desk ornament was only thrown out during Covid, still in as plated condition, though dull, it will work if the right setting.
 

Matt Barnes

Zorg Guru (II)
Supporter
British Zeds
Joined
Jul 18, 2020
Points
123
Location
Portchester, Fareham
Model of Z
1998 BMW Z3 Individual 1.9 M44 B19
I was lucky with the copper plating, I spoke to the one guy left in the hosp right before he retired, plated anything and everything until the copper crystals ran out.
I’m sure my boss used the hand drier when gold plating, from what I saw it worked well with a new battery, so I expect it was the same as the copper, get a thin layer on quickly to fully coat the part, then build up slowly to get a smooth coating. If I tried to build up quickly with copper I got a ‘spiky’ surface, pulled the copper out of solution too quickly for any circulation to replenish it. I think. The tank had no method of mixing or circulating the solution.
I was too junior to be allowed near the gold unit, only joined the dept, ‘85/86 maybe. One of the copper pieces I used as a desk ornament was only thrown out during Covid, still in as plated condition, though dull, it will work if the right setting.
I've hot a couple of heat guns which I now use to dry the parts when they come out the zinc bath before passivating, guess I could just wait until after passivating and then dry them off with the gun. I've read that you shouldn't let the parts get too hot or else it ruins the finish...guess there's one way to find out!... but the rust issue is now cured, so it's just getting my technique down for a bright shiny zinc finish
 

Matt Barnes

Zorg Guru (II)
Supporter
British Zeds
Joined
Jul 18, 2020
Points
123
Location
Portchester, Fareham
Model of Z
1998 BMW Z3 Individual 1.9 M44 B19
Not much going on today, plus having to do Christmassy stuff ! 🎄 🎄

So I gave a first coat of Hammerite Black Smooth to the Anti Roll Bar and bar bush brackets and the exhaust hanger bracket. Wait for those to dry then turn over and do the undersides...….

1703160351162.png

1703160386053.png

1703160411474.png


once that's all done, I might have a go at some more plating, then it's getting the Trailing Arm bushes in and Subframe bushes. Not got a Diff bush yet, so need to get one of those and then take the Diff backplate off and get a bush pressed in.... oooo I need to order new brake backplates as well as I snipped the old ones off and they're very crusty as well.
 

IainP

Zorg Guru (II)
British Zeds
Joined
Feb 20, 2019
Points
119
Location
Out of my Tree, North of Perth, Scotland
Model of Z
1.9
I chamfered one edge of the diff bush slightly more than it was already, lubed it with a little silicone, started it with a little hammer, then pressed it in.
If you’re using rubber bushes I have plenty of the proper lubricant for them if you want some.
 

Matt Barnes

Zorg Guru (II)
Supporter
British Zeds
Joined
Jul 18, 2020
Points
123
Location
Portchester, Fareham
Model of Z
1998 BMW Z3 Individual 1.9 M44 B19
I chamfered one edge of the diff bush slightly more than it was already, lubed it with a little silicone, started it with a little hammer, then pressed it in.
If you’re using rubber bushes I have plenty of the proper lubricant for them if you want some.
Thanks Iain....I've got plenty of silicon grease for the bushes....thanks for the tip about the Diff bush...I'll make sure to do that! :thumbsup:
 

Matt Barnes

Zorg Guru (II)
Supporter
British Zeds
Joined
Jul 18, 2020
Points
123
Location
Portchester, Fareham
Model of Z
1998 BMW Z3 Individual 1.9 M44 B19
As you can guess VERY little being done on the car at the moment... for some strange reason 🎄 :santa::3santas:

but... I'm really impressed with how the Hammerite Smooth is panning out. Anti Roll Bar, and ARB bush brackets have settled well from a week ago. That's two coats of Red Oxide followed by two coats of Smooth Black. My DIY Zinc Plating seems to be holding up in the garage given it's been subject to various temperature changes and humidity... still might give that another crack though to get it more uniform.

Oh and ignore those discs, they're going, as I have new ones

1703774093675.png
 

Matt Barnes

Zorg Guru (II)
Supporter
British Zeds
Joined
Jul 18, 2020
Points
123
Location
Portchester, Fareham
Model of Z
1998 BMW Z3 Individual 1.9 M44 B19
So today I decided to brave jacking the car up enough to get all four wheels off the ground.... on a slope and on a resin driveway (very expensive !!).... To say I was initially cr@pping myself is an understatement. I thought I'd try with a big lump of wood and jack under across the prop shaft tunnel but it just didn't feel right, so abandoned that idea... then I decided to heed the advice of @DrWong , @IainP and @Althulas and gently, little by little do each corner. The rear end looks really high, firstly because it is to counteract the slope.

Initially I used a long block of wood on the chassis rails, which lifted the whole offside.

1704554948167.png


Then I lifted the rear jackstand up a notch and gently slid the red jack under the chassis rail.

1704555021748.png


then had to add "shims" of wood planking under the rear jackstand to take up the slack. I didn't want to have three jackstand holes exposed as that felt too unstable, so I'd rather lift the jackstand higher than make it taller !

you have probably see at the back the angle of the slope. Then repeated on the offside... doing it literally inch by inch, adjusting the wood and adjusting the stands as I went... eventually got it so that I can just move the front tyres... they'll be staying on until I need each one off in turn.

1704555353130.png

1704555387838.png

1704555415231.png


Phew !!.. think I've earned a drink after that !
 

Attachments

Althulas

Zorg Guru (V)
Supporter
British Zeds
Joined
Jun 14, 2014
Points
198
Location
Banburyshire
Model of Z
M Roadster
That is a bit of a slope, I didn’t realise it had that much incline. To be honest seeing that pic I would consider just have the back jacked up and the front wheels firmly on terra firms and finish the rear end, then work as far forwards as you can with the ? Fuel lines I can see on the floor. Then have you car firmly on it rear wheels and chocked etc and then work at the front. It would be a lot more safer and probably save you having to wear bicycle clips. Stay safe.
 

Matt Barnes

Zorg Guru (II)
Supporter
British Zeds
Joined
Jul 18, 2020
Points
123
Location
Portchester, Fareham
Model of Z
1998 BMW Z3 Individual 1.9 M44 B19
That is a bit of a slope, I didn’t realise it had that much incline. To be honest seeing that pic I would consider just have the back jacked up and the front wheels firmly on terra firms and finish the rear end, then work as far forwards as you can with the ? Fuel lines I can see on the floor. Then have you car firmly on it rear wheels and chocked etc and then work at the front. It would be a lot more safer and probably save you having to wear bicycle clips. Stay safe.
haha... thank you mate...I'm not taking the fronts off until the last minute...they just touch the ground..what I might do is fix the sills then get the rear on the rear jack pads...that's just the vent pipe, fuel lines are still clipped in and need to be replaced along with all the brake lines...now I know I can do it, I might put the rear onto the jackpads until I need the space to weld up...cheers mate
 
Last edited:

DrWong

Zorg Guru (III)
Joined
May 8, 2017
Points
125
Model of Z
3.0i
Good work mate. Always a bit unnerving getting the whole car in the air. Probably a sensible idea to chock the front wheels anyway, accepting that they're not quite touching the ground etc.
 

Matt Barnes

Zorg Guru (II)
Supporter
British Zeds
Joined
Jul 18, 2020
Points
123
Location
Portchester, Fareham
Model of Z
1998 BMW Z3 Individual 1.9 M44 B19
it's been a while !.... been doing some work on my Octavia VRS and trying to solve a riddle on my Peugeot 206 ABS !.. but I'll save you that story !

so thought I'd start adding a bit of top coat to the calipers. went for Hammerite Silver Smooth and mightily impressed with it . As usual I've done the top side, let it dry then flip it over.. as painting hanging parts doesn't really work for me...
1706460401539.png
1706460423715.png


1706460445354.png

1706460466910.png
 

Matt Barnes

Zorg Guru (II)
Supporter
British Zeds
Joined
Jul 18, 2020
Points
123
Location
Portchester, Fareham
Model of Z
1998 BMW Z3 Individual 1.9 M44 B19
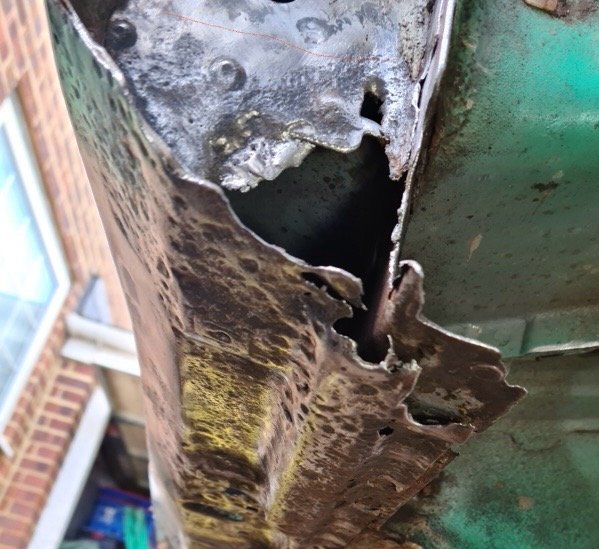
knew my luck would run out at some point.... decided to get back onto bodywork and this is the surface rust that accumulated from when I was last under there....
1707569898902.png


took all of 10 minutes to grind it off but it's nowhere near suitable for Lechlar epoxy @DrWong so I've ordered POR15 grey (for a lighter top coat)

1707569997731.png


Before I started probing around in the wheel arch !

1707581134500.png


I decided to get the front wheel off and that's where my luck ran out.... pushed the grommet and my finger went through. Decided to grind back to good metal..

1707570095517.png

1707570125156.png


I'm wondering now what the options are.... do I chop out and let in a new piece? or weld a patch over the top?A pro would chop out and let in I guess....So I get to learn fabrication earlier than I planned @IainP !! :whistle:

I thought the inside had gone as well, but after grinding back it was crusty rust and lifted seam sealer....

1707570944911.png

1707571091201.png


actually.... have I struck lucky?.... just noticed three rivets and above that is good clean steel.... maybe I can weld a patch in where that sheet meets the rusted part, below the dotted line
1707574399913.png


just for a bit of protection I coated the front in POR15 Metal Prep.. then washed off and dried

1707578587501.png


did the same with the rear
1707578621647.png


Then gave a protective coat of POR15 Preventative paint....not sure what I expected but it was a LOT thinner that what I thought it would be.. a lot thinner than Hammerite !!

1707578710164.png

1707578740789.png


it's been a while since that wheel turned !!! :whistle:

1707578781869.png
 

Attachments

Last edited:

Matt Barnes

Zorg Guru (II)
Supporter
British Zeds
Joined
Jul 18, 2020
Points
123
Location
Portchester, Fareham
Model of Z
1998 BMW Z3 Individual 1.9 M44 B19
I would cut it all tha section out and make a plate with a step that goes behind the spot welds. You spot weld at the drill out spot welds and butt/seam weld across and the outside of the plate.
aaah.. I like this..proper fabrication! cheers mate
 

Althulas

Zorg Guru (V)
Supporter
British Zeds
Joined
Jun 14, 2014
Points
198
Location
Banburyshire
Model of Z
M Roadster
If you watch Yorkshire arresorations on YouTube you can get some ideas that can be achieved with there approach to patch panel making but as I said before you have to be brutal and cut the crap stuff out no point in plating over rusty stuff, it’s shoddy and will come back to haunt you if you keeping your car.
 

Matt Barnes

Zorg Guru (II)
Supporter
British Zeds
Joined
Jul 18, 2020
Points
123
Location
Portchester, Fareham
Model of Z
1998 BMW Z3 Individual 1.9 M44 B19
If you watch Yorkshire arresorations on YouTube you can get some ideas that can be achieved with there approach to patch panel making but as I said before you have to be brutal and cut the crap stuff out no point in plating over rusty stuff, it’s shoddy and will come back to haunt you if you keeping your car.
funnily enough I watched the whole Mat Armstrong BMW restoration series...that Ryan was welding in tiny patches!
 

IainP

Zorg Guru (II)
British Zeds
Joined
Feb 20, 2019
Points
119
Location
Out of my Tree, North of Perth, Scotland
Model of Z
1.9
Ahh
You want to cut it above this faint red line
IMG_5401.jpeg
Just above the square hole.
First though, to make a pattern use several layers of masking tape. That will peel off in the shape of the metal you need to make. Snip the corners and spread it out, now you have the corner angles you need to cut to allow it to fold neatly.
Bottom fold first, then the sides. Trial fit, it won’t go into place, since you haven’t cut yet.
Mark or centre punch a dot vertically above the square hole, 50mm or whatever convenient, mark the distance.
Now you can cut out.
Cut exact if you want to butt weld.
Cut 5mm lower if you want to tuck behind it, either riveting in place before welding, or plug/rosette welding.
I’d cut a chunk of that sill off, 60-100mm, and remake it, you can hammer form that channel over some pieces of wood. Sound much more daunting than it actually is.
Oh and remake the square hole, drill and file from your measurement.
 

Matt Barnes

Zorg Guru (II)
Supporter
British Zeds
Joined
Jul 18, 2020
Points
123
Location
Portchester, Fareham
Model of Z
1998 BMW Z3 Individual 1.9 M44 B19
Ahh
You want to cut it above this faint red line
View attachment 290705
Just above the square hole.
First though, to make a pattern use several layers of masking tape. That will peel off in the shape of the metal you need to make. Snip the corners and spread it out, now you have the corner angles you need to cut to allow it to fold neatly.
Bottom fold first, then the sides. Trial fit, it won’t go into place, since you haven’t cut yet.
Mark or centre punch a dot vertically above the square hole, 50mm or whatever convenient, mark the distance.
Now you can cut out.
Cut exact if you want to butt weld.
Cut 5mm lower if you want to tuck behind it, either riveting in place before welding, or plug/rosette welding.
I’d cut a chunk of that sill off, 60-100mm, and remake it, you can hammer form that channel over some pieces of wood. Sound much more daunting than it actually is.
Oh and remake the square hole, drill and file from your measurement.
thank you mate...I knew you'd have the answer...I'll try some practice runs before attempting on the car....mind you, that sill can't get any worse 😀
 
Top