#ZedShed Project Scarlett - Refurbishing Davids Z3

Lee

Zorg Expert (I)
British Zeds
M Power
#ZedShed
Joined
Mar 26, 2014
Points
213
Location
Basingstoke
Model of Z
Z4 Coupe 3.0si
UPDATE:

First up was to address the oil leak............ still addressing. Found the source though. The leak appears to be the oil filter housing that bolts to the engine, pictures do the talking for me.

1) Fix leak
2)Change of all fluids (Full service etc)
3)Clean up brakes (car lives by the sea lots of corrosion)
4)Inspect rear shocks (Car appears too bouncy one has blown)
5)Spacers for the rear (20mm)

Looks like I have got my work cut out.

IMG_1513.webp


IMG_1521.webp


Looks far too moist.

IMG_1522.webp


Lee
 
You shop at Andrew Page, Lee?

Tony.
 
@t-tony I hold accounts with GSF and Euro carparts. This time I picked my parts up from GSF.
 
UPDATE:

First up was to address the oil leak............ still addressing. Found the source though. The leak appears to be the oil filter housing that bolts to the engine, pictures do the talking for me.

1) Fix leak
2)Change of all fluids (Full service etc)
3)Clean up brakes (car lives by the sea lots of corrosion)
4)Inspect rear shocks (Car appears too bouncy one has blown)
5)Spacers for the rear (20mm)

Looks like I have got my work cut out.

You are a top lad, Lee.

As the old saying goes - I thank you from my bottom to my heart.
:wideyed::facepalm:
 
@t-tony I hold accounts with GSF and Euro carparts. This time I picked my parts up from GSF.

Hi Lee, only asked as our local AP stock all the brands you have there.;) We have GSF and ECP in Lincoln too. I reckon you will soon have those few bits done and dusted.

Tony.
 
Yeah going to drop the oil so I can remove the filter housing. Will need to consult the archives to see if it requires a gasket.

Also replace the aux belt.

:) Keeps me out of trouble.
 
Yeah going to drop the oil so I can remove the filter housing. Will need to consult the archives to see if it requires a gasket.

Also replace the aux belt.

:) Keeps me out of trouble.

Yeah mate, me too.;)

Tony.
 
@David - I popped over to help (or hinder) Lee last night and took a few photos.

Big thanks to @Shortie_gal for the cups of coffee and lasagna break... :angelic:

Plenty of room to work on the front of the engine... :whistle: Lee wanted to stand in there so we could take his photo, but was worried he might not be able to get out.
2015-01-16 18.28.04.webp


2015-01-16 18.28.11.webp


Leftover spare bits. Every project has them - soon to be listed on eBay :ymdevil:
2015-01-16 18.28.19.webp


The probable culprit. Leaking around the gasket to the oil filter. New gasket fitted after a good degreasing of the general area.
2015-01-16 18.32.45.webp


Spark plug change along with oil, oil filter and air filter. Oil had the consistency of molasses (probably not help with it being so cold in the garage).

Spark plugs were Bosch, replaced with NGK. It's an M43 4cyl engine, and despite the side access to the spark plugs straightforward enough to change them compared to the 6 pots (no having to remove the plastic top covers and coil packs).
2015-01-16 19.39.49.webp


Fired her up after everything was reassembled, and boy did she sound SWEET! Purring like a kitten. Should drive like a dream when she's on the ground again :)
 
Gee-whizz, I sure am excited to pick her up next week. I can't state how grateful I am for not just @Lee 's and @GazHyde 's help (and of course the hot drinks provided to them by @Shortie_gal), but to anybody on here who has offered me help, advice and opinions throughout my ownership of Scarlett.

For future reference Lee, I would've loved to see a picture of you stood inside the engine bay!
 
I've created this progress thread for the work on @David's Z3 to keep it all together!

Work at Lees started with tidying up some grotty looking parts. The engine cross brace was sanded down and treated to a coat of black paint. The rear discs also sanded down, masked and given a coat of silver.

Attention turned to checking over the rear suspension - shocks, bushes etc. I have some interesting videos to upload to YouTube when I get chance. After a few minutes inspection it was pretty clear that the rear end needed a complete refresh.
  • Rear shocks weak (leaking on drivers side). Driver side could be completely compressed with no rebound. Passenger side would expand, but at a glacial pace. VIDEO to follow.
  • Drivers side beam bush looks to have failed, passenger side seems 'okay'.
  • Swing arm bushes badly perished
  • Drop links rubber perished
  • Handbrake cable split
After lee had a chat with David he approved the sub frame work, so we proceeded to strip everything down.

Exhaust: Nice and easy on the M43, comes in 1 piece from the manifold backwards. Removed without any real issue.

Rear Wheel Carrier: This was a pig to remove due to the amount of surface corrosion, and the nuts holding it in place falling apart when a socket was put on them.

Classic Z3 spare wheel once removed. Would hate to have to actually use this if needed. David said he didn't want it put back anyway, which is just as well!
2015-01-17 15.57.35.webp


For those wanting to remove the carrier, once it's lowered the tethering cable screws out on a thread. I've seen some people get stuck with this and cut the cable instead.
2015-01-17 16.04.39.webp


As you can see pretty much nothing useful left of the nut to put a socket on to. Surface corrosion is going to be something of a theme as we work on this one...
2015-01-17 16.10.54.webp


Little we could do other than get the angle grinder on it (we tried a dremmel first, but that just ate the cutting discs). Access was a pain, so we had to cut the bolt in the middle and then feed the two halves of the bolts out.

If you look carefully at the picture above you can see what we think is the factory label similar to the ones on Rosie. Looks like these have been on for 15 years as well!

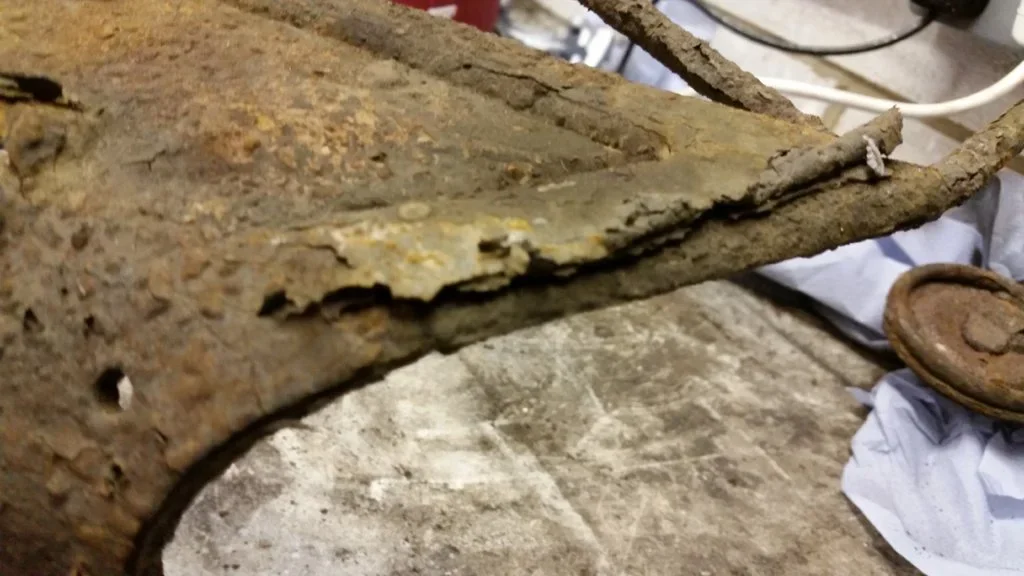
The next two pictures are to give some idea of the level of corrosion underneath - this is the spare wheel carrier. We will most likely be replacing quite a few bolts and nuts as we go along.
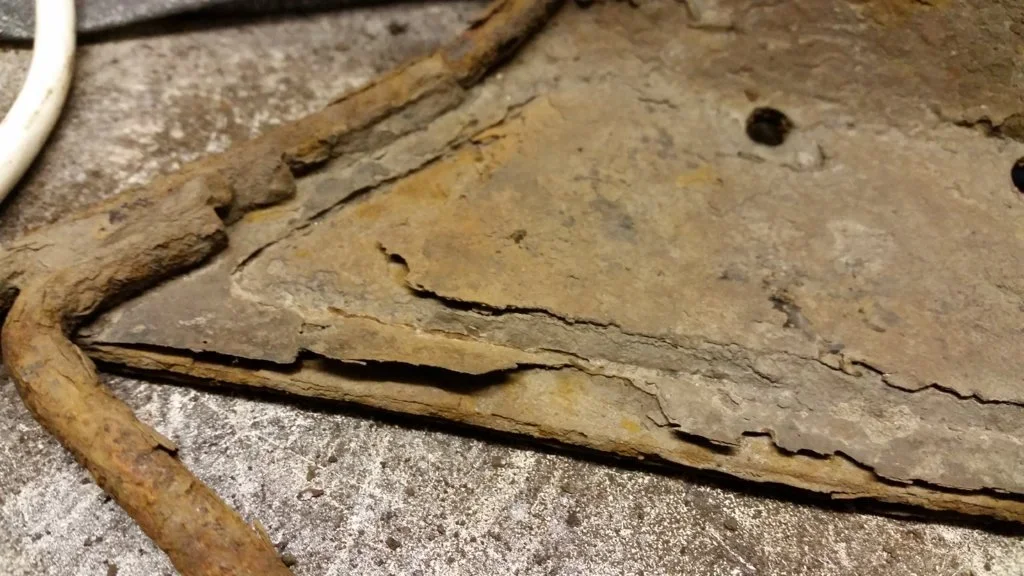
2015-01-17 16.39.30.webp 2015-01-17 16.40.08.webp

Also a picture of one of the rear caliper carriers...
2015-01-17 14.04.41.webp


Following on from this we carried on with the usual process... (no pictures)
  • Unbolted the bottom of the shocks (left them hanging from the top for now)
  • Clamped and disconnected the rear brake lines
  • Unbolted the ARB bushes
  • Removed the handbrake cables
  • Loosened the nuts on the bottom of the beam bushes
We had to stop at this point as we were struggling to remove the hex headed bolts holding the beam brackets in place on the drivers side. Given them a really good soaking in WD40 and will leave that to work it's magic.

Once those are removed, we are able to carry on disconnecting the diff and dropping the sub frame beam. This will most likely be Monday or Tuesday evening.

 
Well done Lee another one coming back to good health. I bet you are getting impatient Davis just hope it stays warm enough for the boys and girls to finish.
 
Great effort @Lee you're single-handedly keeping the Z3 brand on the road!

Shame I couldn't drop my coupe round one day, would have got closer to asking price for her!

BUT....... Do you dish out sausage sandwiches for all guests?
 
I mentioned in my last update that there were a couple of videos. Just got them from Pauls phone, and uploaded them. Please don't get worried David, we know what we are doing - honest :shifty:

The first video is titled "Who let Gaz near the angle grinder". The angle grinder, perfect for those stubborn to remove items...
View: http://youtu.be/0dKArOxkj8g


The second video is titled "You'll get a few more years out of those" or "why does my shock absorber moo like a cow"
View: http://youtu.be/eJv0fquI6Cc
 
So, if you would like to bring the car up to Lincoln.......=))=))=))=)) And GH where were your goggles when using an angle grinder, I used to use my specs too. Naughty boy.

Tony.
 
Back
Top